Black Deck
Banks, kick systems and escape routes: work from a geometric reference and calibrate at the table.
Explore the cards →Free Black Practice Book availability →
Five decks. Find your next focus.
Explore how 260 practice cards connect across 13 skills. Choose a skill to compare the five decks and find the cards behind each count.
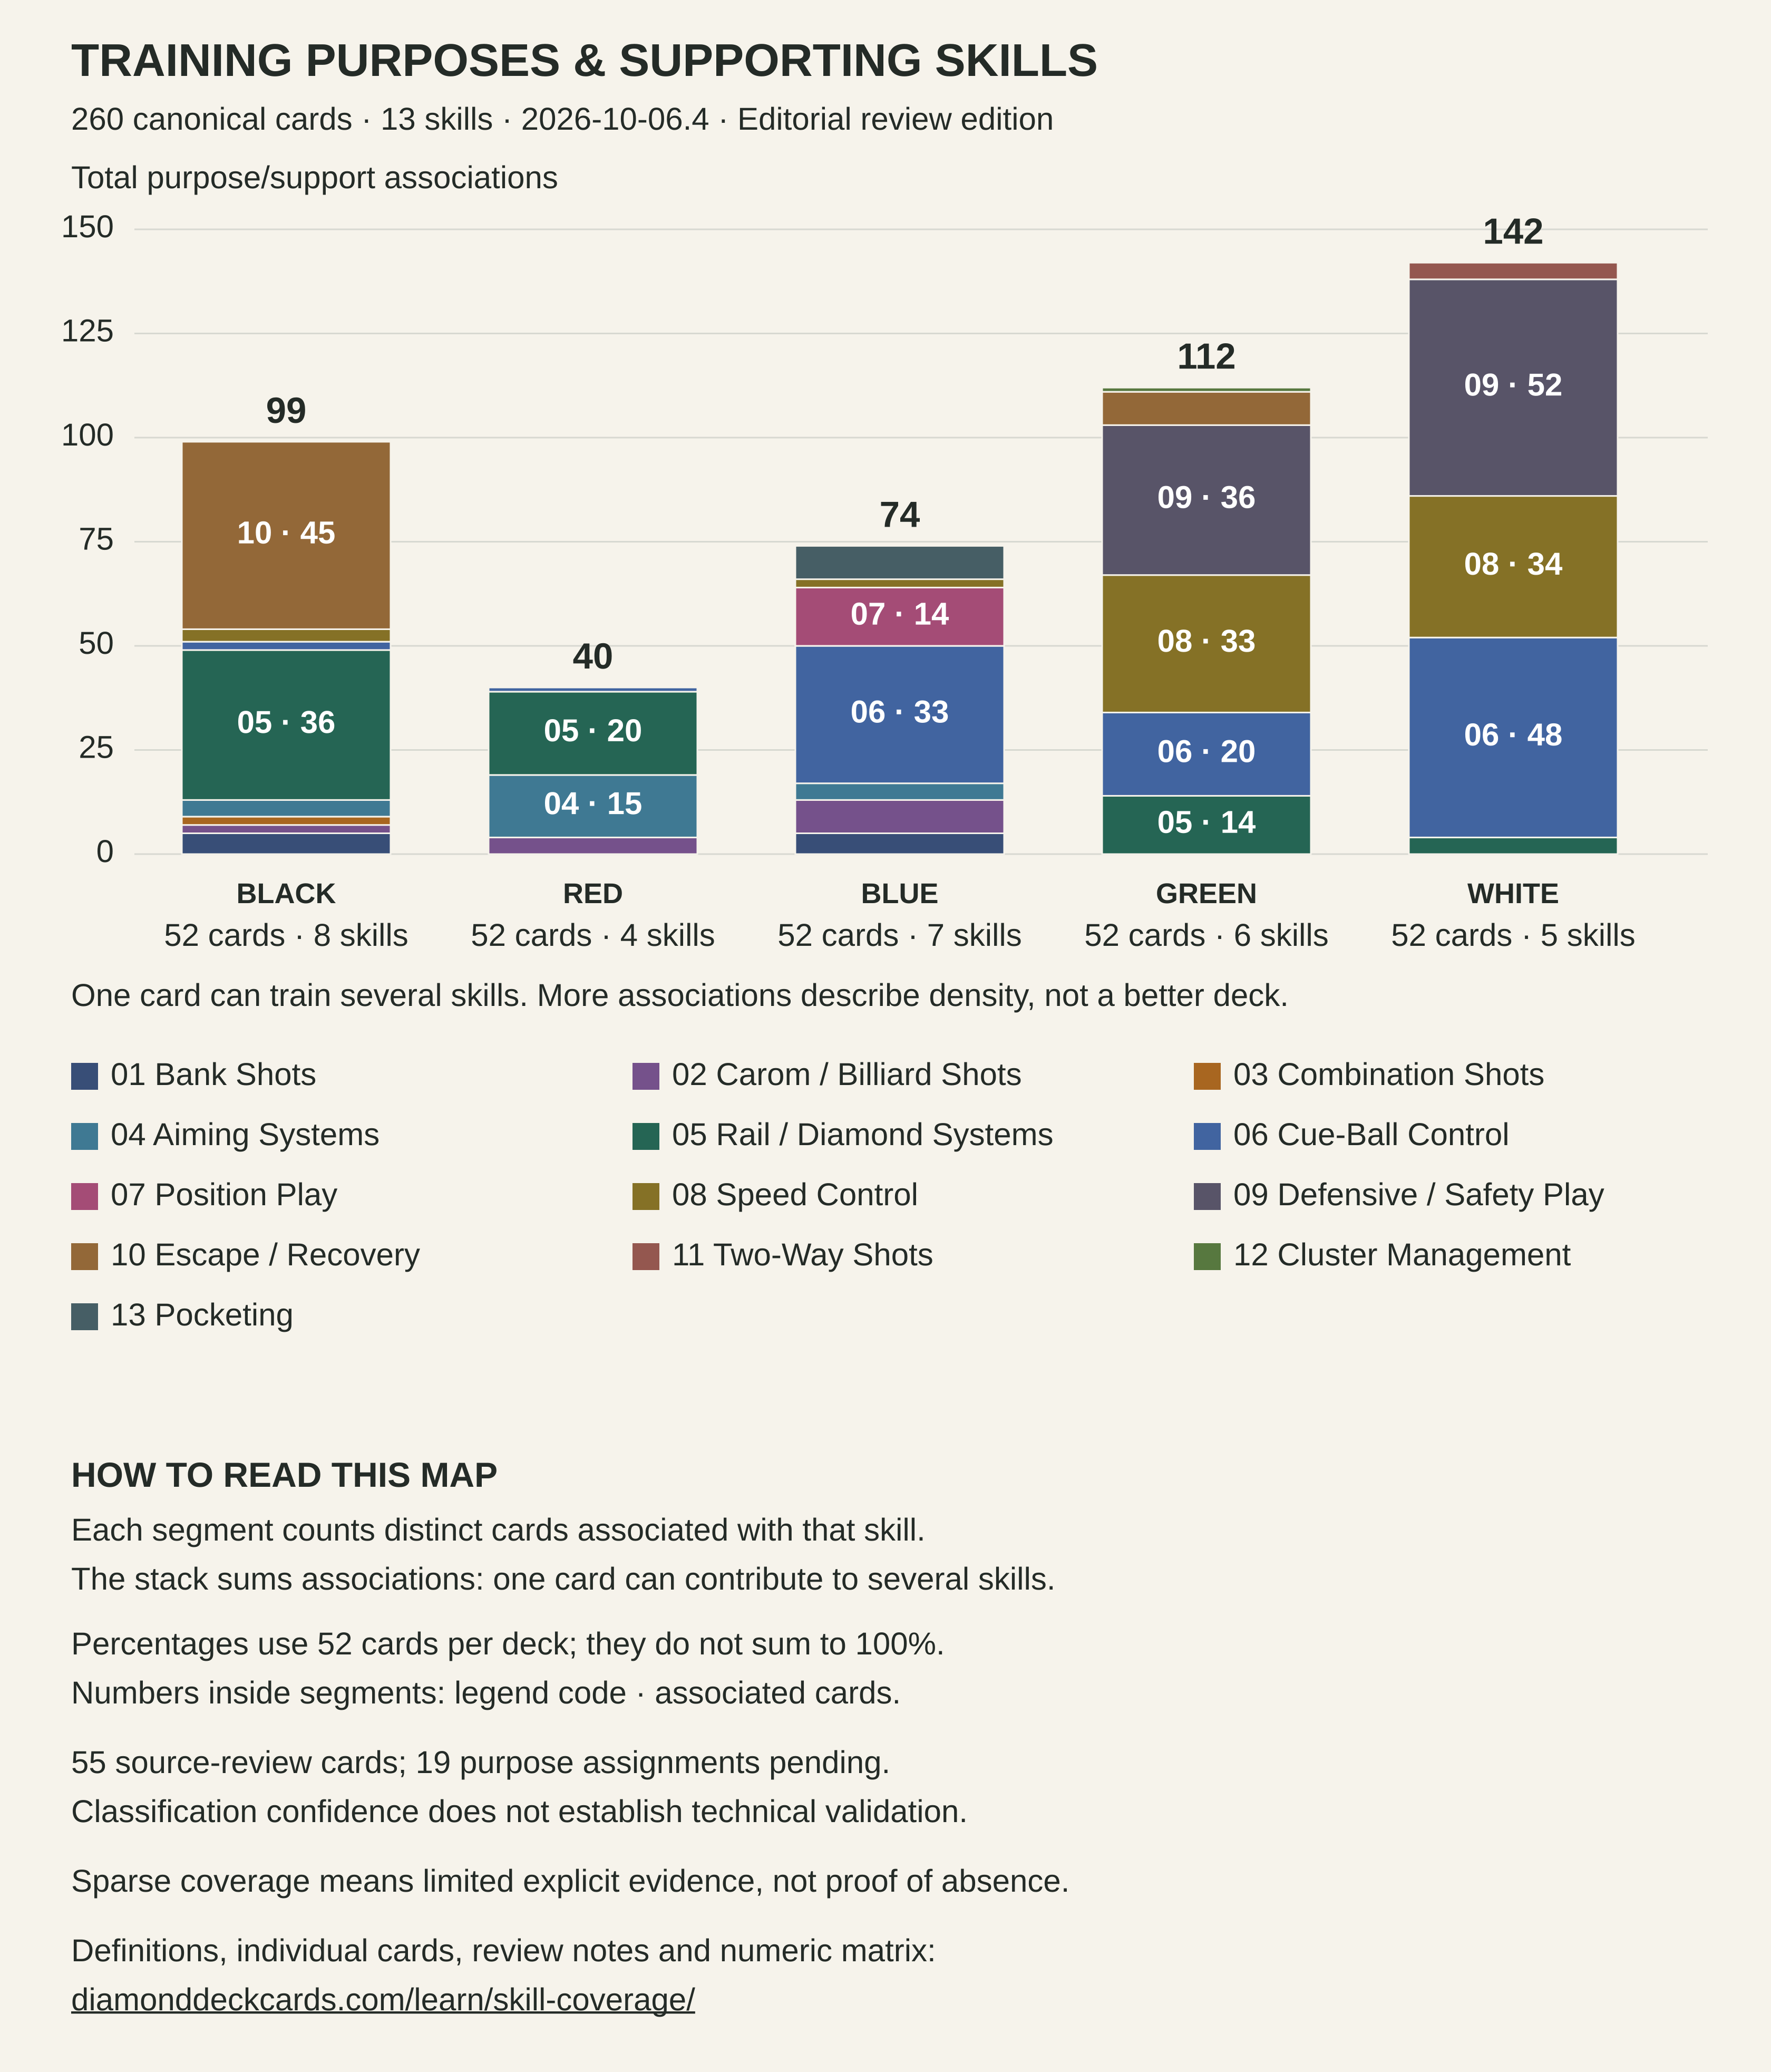
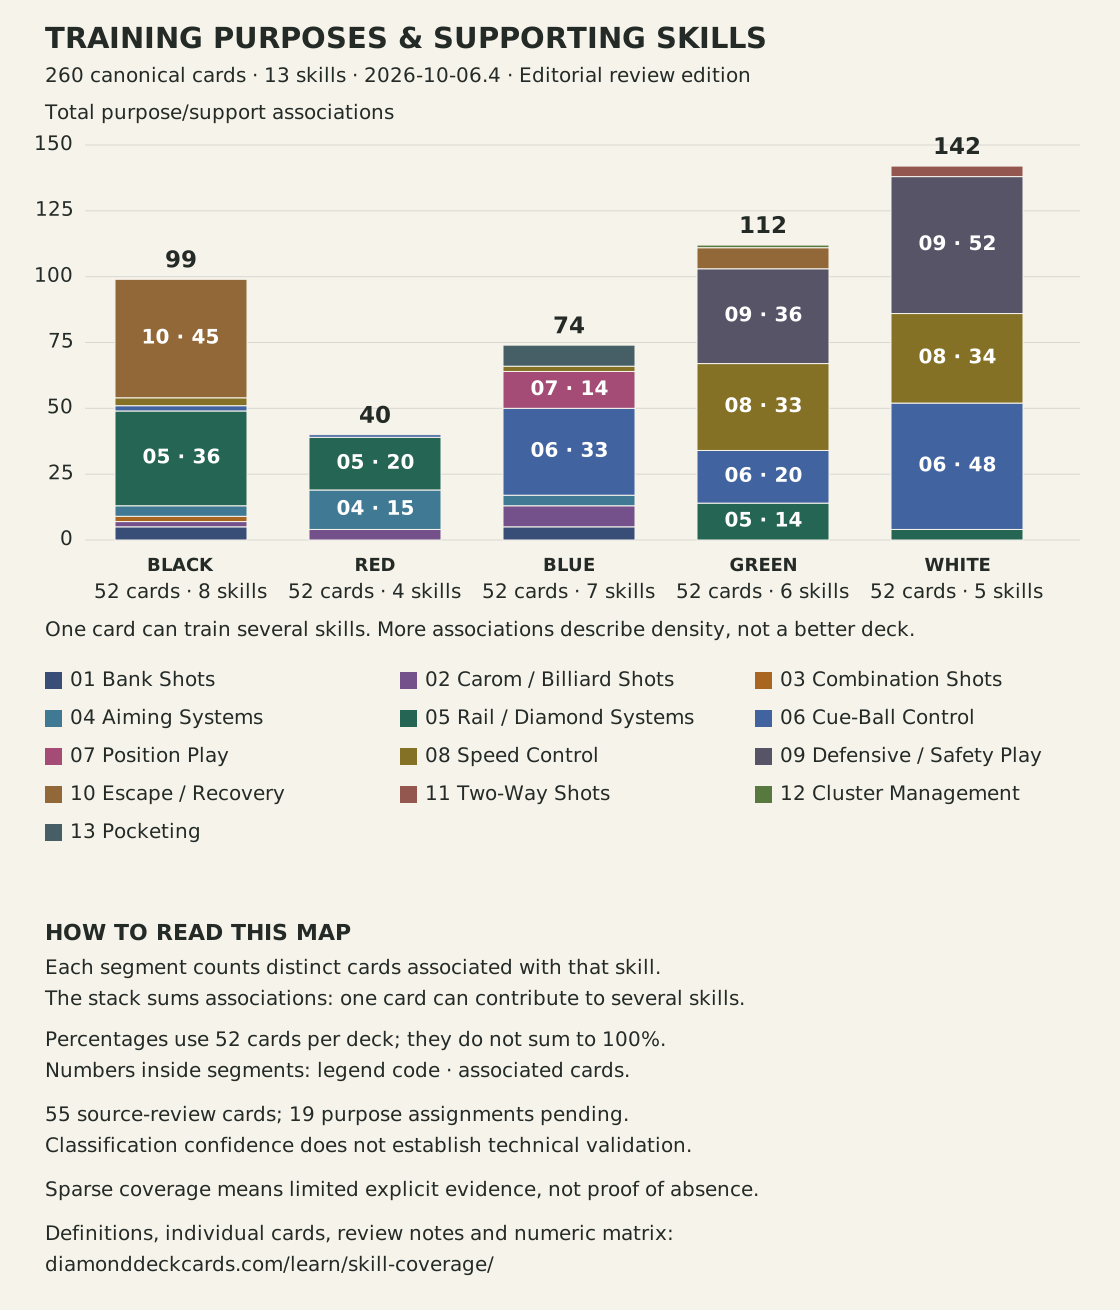
Two separate maps. The first compares training purposes and supporting skills, including defensive cue-ball control and speed control. The second compares shot implementation: kick routes, spin, clock settings and hardness. White remains defensive on all 52 cards; Black has 45 escape associations. White's possible additional position-play purposes still need individual review.
19 cards have documented implementation but no separate purpose assigned yet. They remain in the 52-card denominator and contribute no purpose associations until reviewed. This is an evidence gap, not a statement that they lack a purpose.
Editorial review edition. 55 cards have open author-review notes. The full map includes proposed classifications; the high-confidence view excludes those cards. Confidence describes the classification evidence, not table testing or technical approval.
Read the library
Each deck contains 52 physical cards. The bar height counts skill associations: a card can contribute to several skills, once to each.
More skill associations indicate greater multi-skill density under this taxonomy. They do not make a deck better, harder, or more comprehensive.
Use the card evidence to compare different aspects of your goal. The counts include primary and supporting skills; this is an editorial review map.
Banks, kick systems and escape routes: work from a geometric reference and calibrate at the table.
Explore the cards →Compare the recorded carom and rail-system coverage; several intended purposes still need author review.
Explore the cards →Compare cue-ball continuation and multi-ball situations; contact-order questions remain under review.
Explore the cards →Defensive situations, supporting speed and cue-ball control, plus rail-system escape routes. Compare the individual diagrams.
Explore the cards →Every card has a defensive purpose. Cue-ball and speed control support the safety; some may also teach position play.
Explore the cards →On a phone, swipe the chart sideways or use the skill selector for a compact comparison. Segment numbers match the legend.
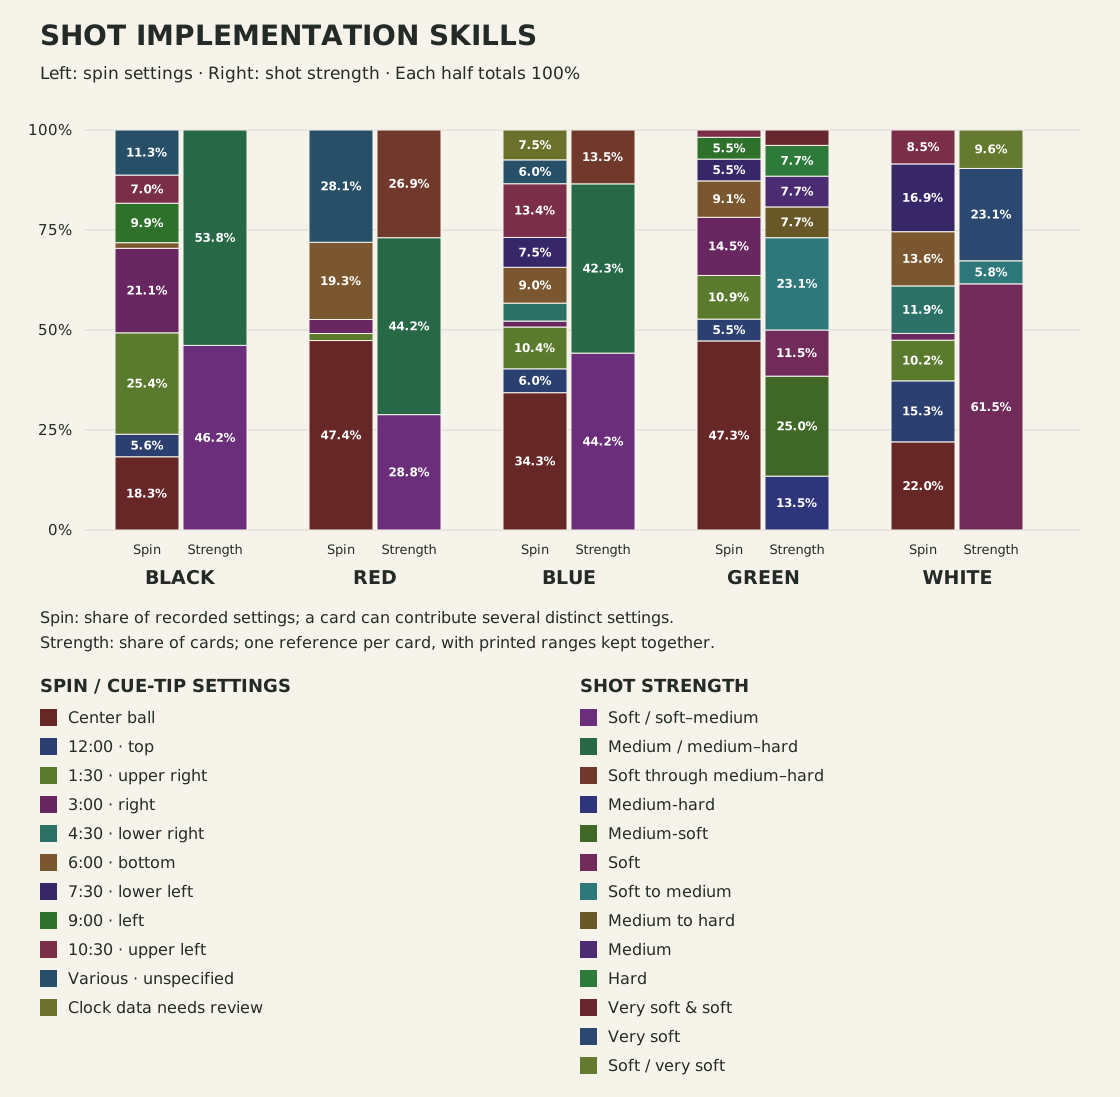
How the shot is executed
Application prescription snapshot; later book revisions may differ. Hover over a segment for its exact percentage.
52 cards · 99 associations · 8 skills
Top coverage: Escape / Recovery (45) · Rail / Diamond Systems (36) · Bank Shots (5)
4 cards awaiting author review
Explore black Deck →Explore the companion book →52 cards · 40 associations · 4 skills
Top coverage: Rail / Diamond Systems (20) · Aiming Systems (15) · Carom / Billiard Shots (4)
10 cards awaiting author review
Explore red Deck →Explore the companion book →52 cards · 74 associations · 7 skills
Top coverage: Cue-Ball Control (33) · Position Play (14) · Carom / Billiard Shots (8)
20 cards awaiting author review
Explore blue Deck →Explore the companion book →52 cards · 112 associations · 6 skills
Top coverage: Defensive / Safety Play (36) · Speed Control (33) · Cue-Ball Control (20)
8 cards awaiting author review
Explore green Deck →Explore the companion book →52 cards · 142 associations · 5 skills
Top coverage: Defensive / Safety Play (52) · Cue-Ball Control (48) · Speed Control (34)
13 cards awaiting author review
Explore white Deck →Explore the companion book →Each cell shows associated cards, percentage of the deck’s 52 cards, and primary (P) / secondary (S) assignments. Percentages do not sum to 100%. Zero means no qualifying association in this evidence view, not proof that a skill never appears.
| Skill | black | red | blue | green | white |
|---|---|---|---|---|---|
| Bank Shots | 5 / 52 · 9.6%P 5 · S 0 | 0 / 52 · 0.0%P 0 · S 0 | 5 / 52 · 9.6%P 1 · S 4 | 0 / 52 · 0.0%P 0 · S 0 | 0 / 52 · 0.0%P 0 · S 0 |
| Carom / Billiard Shots | 2 / 52 · 3.8%P 2 · S 0 | 4 / 52 · 7.7%P 4 · S 0 | 8 / 52 · 15.4%P 8 · S 0 | 0 / 52 · 0.0%P 0 · S 0 | 0 / 52 · 0.0%P 0 · S 0 |
| Combination Shots | 2 / 52 · 3.8%P 2 · S 0 | 0 / 52 · 0.0%P 0 · S 0 | 0 / 52 · 0.0%P 0 · S 0 | 0 / 52 · 0.0%P 0 · S 0 | 0 / 52 · 0.0%P 0 · S 0 |
| Aiming Systems | 4 / 52 · 7.7%P 0 · S 4 | 15 / 52 · 28.8%P 12 · S 3 | 4 / 52 · 7.7%P 4 · S 0 | 0 / 52 · 0.0%P 0 · S 0 | 0 / 52 · 0.0%P 0 · S 0 |
| Rail / Diamond Systems | 36 / 52 · 69.2%P 31 · S 5 | 20 / 52 · 38.5%P 20 · S 0 | 0 / 52 · 0.0%P 0 · S 0 | 14 / 52 · 26.9%P 8 · S 6 | 4 / 52 · 7.7%P 0 · S 4 |
| Cue-Ball Control | 2 / 52 · 3.8%P 0 · S 2 | 1 / 52 · 1.9%P 0 · S 1 | 33 / 52 · 63.5%P 22 · S 11 | 20 / 52 · 38.5%P 0 · S 20 | 48 / 52 · 92.3%P 0 · S 48 |
| Position Play | 0 / 52 · 0.0%P 0 · S 0 | 0 / 52 · 0.0%P 0 · S 0 | 14 / 52 · 26.9%P 14 · S 0 | 0 / 52 · 0.0%P 0 · S 0 | 0 / 52 · 0.0%P 0 · S 0 |
| Speed Control | 3 / 52 · 5.8%P 0 · S 3 | 0 / 52 · 0.0%P 0 · S 0 | 2 / 52 · 3.8%P 0 · S 2 | 33 / 52 · 63.5%P 0 · S 33 | 34 / 52 · 65.4%P 0 · S 34 |
| Defensive / Safety Play | 0 / 52 · 0.0%P 0 · S 0 | 0 / 52 · 0.0%P 0 · S 0 | 0 / 52 · 0.0%P 0 · S 0 | 36 / 52 · 69.2%P 36 · S 0 | 52 / 52 · 100.0%P 52 · S 0 |
| Escape / Recovery | 45 / 52 · 86.5%P 12 · S 33 | 0 / 52 · 0.0%P 0 · S 0 | 0 / 52 · 0.0%P 0 · S 0 | 8 / 52 · 15.4%P 8 · S 0 | 0 / 52 · 0.0%P 0 · S 0 |
| Two-Way Shots | 0 / 52 · 0.0%P 0 · S 0 | 0 / 52 · 0.0%P 0 · S 0 | 0 / 52 · 0.0%P 0 · S 0 | 0 / 52 · 0.0%P 0 · S 0 | 4 / 52 · 7.7%P 0 · S 4 |
| Cluster Management | 0 / 52 · 0.0%P 0 · S 0 | 0 / 52 · 0.0%P 0 · S 0 | 0 / 52 · 0.0%P 0 · S 0 | 1 / 52 · 1.9%P 0 · S 1 | 0 / 52 · 0.0%P 0 · S 0 |
| Pocketing | 0 / 52 · 0.0%P 0 · S 0 | 0 / 52 · 0.0%P 0 · S 0 | 8 / 52 · 15.4%P 0 · S 8 | 0 / 52 · 0.0%P 0 · S 0 | 0 / 52 · 0.0%P 0 · S 0 |
Rail and diamond systems share one category. Multi-rail describes a route, not automatically a system. Position play is separated from general cue-ball control and defensive leaves.
Object ball rebounds from a cushion toward a pocket. A cue-ball kick and a defensive object-ball route without pocketing intent are not banks.
Cue ball is redirected by a first object ball toward a subsequent target. Includes the documented mixed off-ball/off-rail family.
An object ball transfers motion to another object ball to produce the intended shot result; includes frozen-pair line and throw instruction.
Explicit ball-contact alignment methods: ghost ball, fractions, contact points, edges or frozen center lines. Rail-point constructions are classified separately.
A repeatable numbered, mirrored, midpoint, parallel-line or projected-reference construction locates cushion aim or arrival. An incidental diamond is insufficient.
Explicitly predicts, compares or controls the cue ball after contact, including its route, scratch exposure or finishing zone. Not automatically assigned to every shot.
Choose a cue-ball leave for the next offensive shot, including dedicated hanger exit-route libraries. Generic path prediction and defensive leaves remain separate.
Supporting skill: control pace or travel distance to achieve another training purpose, such as defense, position or a bank. Never a sole or primary purpose. A printed hardness instruction alone is not evidence of speed-control training.
Explicitly denies an opponent a direct or comfortable reply through concealment, distance, separation or a prescribed defensive leave.
Reach a target when direct or simpler access is unavailable. The blocked-access context may be established by the diagram, instructional copy or explicit author intent; a drawn blocker is not required. The author confirms this implicit context for Black kick-route cards. Do not generalize it automatically to every kick or carom in other decks.
A scoring attempt deliberately retains a defensive fallback. Multiple scoring chances alone are not a two-way safety.
Deliberately creates, changes or releases a group of tied balls. Merely using an existing blocker does not qualify.
Explicit direct-pot alignment or pocket acceptance-window instruction. Not automatically added to every scoring drill.
All 260 canonical cards. Choose a skill above to narrow the list.
Primary: Bank Shots
Secondary: Rail / Diamond Systems
Long-cushion bank: use the twice-distance diamond construction to locate the object-ball rebound line.
Shot implementation: Stun / Follow / Draw · Center ball · Soft / soft–medium
Printed clock: CENTER BALL STUN SHOT
Printed hardness: SOFT, OR SOFT TO MEDIUM SHOT · Application source
Clock/hardness prescriptions are the pinned application snapshot; newer book execution revisions may supersede them. Source is shown for review.
Classification confidence: high
Primary: Bank Shots
Secondary: Rail / Diamond Systems · Speed Control
Long-cushion bank: compare the stronger-speed 2.4-distance reference with the soft twice-distance baseline.
Shot implementation: Stun / Follow / Draw · Center ball · Medium / medium–hard
Printed clock: CENTER BALL STUN SHOT
Printed hardness: MEDIUM, OR MEDIUM TO HARD SHOT · Application source
Clock/hardness prescriptions are the pinned application snapshot; newer book execution revisions may supersede them. Source is shown for review.
Classification confidence: high
Primary: Bank Shots
Secondary: Rail / Diamond Systems
Short-cushion bank: transfer the twice-distance construction and observe long-travel arrival error.
Shot implementation: Stun / Follow / Draw · Center ball · Medium / medium–hard
Printed clock: CENTER BALL STUN SHOT
Printed hardness: MEDIUM, OR MEDIUM TO HARD SHOT · Application source
Clock/hardness prescriptions are the pinned application snapshot; newer book execution revisions may supersede them. Source is shown for review.
Classification confidence: high
Primary: Bank Shots
Secondary: Rail / Diamond Systems · Speed Control
Short-cushion bank: adjust the diamond reference as speed increases rather than reusing the soft baseline.
Shot implementation: Stun / Follow / Draw · Center ball · Medium / medium–hard
Printed clock: CENTER BALL STUN SHOT
Printed hardness: MEDIUM, OR MEDIUM TO HARD SHOT · Application source
Clock/hardness prescriptions are the pinned application snapshot; newer book execution revisions may supersede them. Source is shown for review.
Classification confidence: high
Primary: Escape / Recovery
Secondary: None
Straight long-cushion approach: compare upper sidespin and pure sidespin returning lines. Author confirms that this Black kick route also trains escape/recovery: the diagram omits blocking balls, but direct or simpler target access is assumed unavailable.
Shot implementation: Sidespin / English · Kick Shots · 1:30 · upper right · 3:00 · right · Soft / soft–medium
Printed clock: 1:30 O'CLOCK SLIGHT TOP RIGHT, 3 O'CLOCK RIGHT SIDE SPIN
Printed hardness: SOFT, OR SOFT TO MEDIUM SHOT · Application source
Clock/hardness prescriptions are the pinned application snapshot; newer book execution revisions may supersede them. Source is shown for review.
Classification confidence: high
Primary: Escape / Recovery
Secondary: None
Long-cushion spin reflection: follow the spin-generated return through its second cushion continuation. Author confirms that this Black kick route also trains escape/recovery: the diagram omits blocking balls, but direct or simpler target access is assumed unavailable.
Shot implementation: Sidespin / English · Kick Shots · Multi-Rail Routes · 1:30 · upper right · 3:00 · right · Soft / soft–medium
Printed clock: 1:30 O'CLOCK SLIGHT TOP RIGHT, 3 O'CLOCK RIGHT SIDE SPIN
Printed hardness: SOFT, OR SOFT TO MEDIUM SHOT · Application source
Clock/hardness prescriptions are the pinned application snapshot; newer book execution revisions may supersede them. Source is shown for review.
Classification confidence: high
Primary: Escape / Recovery
Secondary: None
Straight short-cushion approach: compare the returning angles produced by the illustrated cue contacts. Author confirms that this Black kick route also trains escape/recovery: the diagram omits blocking balls, but direct or simpler target access is assumed unavailable.
Shot implementation: Sidespin / English · Kick Shots · Various · unspecified · Soft / soft–medium
Printed clock: VARIOUS AIMING POSITION
Printed hardness: SOFT, OR SOFT TO MEDIUM SHOT · Application source
Clock/hardness prescriptions are the pinned application snapshot; newer book execution revisions may supersede them. Source is shown for review.
Classification confidence: high
Primary: Escape / Recovery
Secondary: Speed Control
Long-table spin reflection: the author explicitly makes speed the variable controlling the return. Author confirms that this Black kick route also trains escape/recovery: the diagram omits blocking balls, but direct or simpler target access is assumed unavailable.
Shot implementation: Sidespin / English · Kick Shots · Various · unspecified · Medium / medium–hard
Printed clock: VARIOUS AIMING POSITION
Printed hardness: MEDIUM, OR MEDIUM TO HARD SHOT · Application source
Clock/hardness prescriptions are the pinned application snapshot; newer book execution revisions may supersede them. Source is shown for review.
Classification confidence: high
Primary: Rail / Diamond Systems
Secondary: Escape / Recovery
Oblique long-cushion approaches: compare upper and pure sidespin offsets from the twice-aiming-distance reference. Author confirms that this Black kick route also trains escape/recovery: the diagram omits blocking balls, but direct or simpler target access is assumed unavailable.
Shot implementation: Sidespin / English · Kick Shots · Various · unspecified · Soft / soft–medium
Printed clock: VARIOUS AIMING POSITION
Printed hardness: SOFT, OR SOFT TO MEDIUM SHOT · Application source
Clock/hardness prescriptions are the pinned application snapshot; newer book execution revisions may supersede them. Source is shown for review.
Classification confidence: high
Primary: Rail / Diamond Systems
Secondary: Escape / Recovery
Compare center-ball, outer-sidespin and backspin arrival offsets; the latest author revision replaces the earlier speed-only explanation. Author confirms that this Black kick route also trains escape/recovery: the diagram omits blocking balls, but direct or simpler target access is assumed unavailable.
Shot implementation: Sidespin / English · Kick Shots · Stun / Follow / Draw · Various · unspecified · Medium / medium–hard
Printed clock: VARIOUS AIMING POSITION
Printed hardness: MEDIUM, OR MEDIUM TO HARD SHOT · Application source
Clock/hardness prescriptions are the pinned application snapshot; newer book execution revisions may supersede them. Source is shown for review.
Classification confidence: high
Primary: Escape / Recovery
Secondary: None
Trace the zero-offset multi-cushion continuation and the effect of the indicated spin on the returning route. Author confirms that this Black kick route also trains escape/recovery: the diagram omits blocking balls, but direct or simpler target access is assumed unavailable.
Shot implementation: Kick Shots · Multi-Rail Routes · Sidespin / English · Various · unspecified · Medium / medium–hard
Printed clock: VARIOUS AIMING POSITION
Printed hardness: MEDIUM, OR MEDIUM TO HARD SHOT · Application source
Clock/hardness prescriptions are the pinned application snapshot; newer book execution revisions may supersede them. Source is shown for review.
Classification confidence: high
Primary: Escape / Recovery
Secondary: None
Trace the one-diamond-offset multi-cushion continuation rather than treating crossed paths as one shot. Author confirms that this Black kick route also trains escape/recovery: the diagram omits blocking balls, but direct or simpler target access is assumed unavailable.
Shot implementation: Kick Shots · Multi-Rail Routes · Sidespin / English · Various · unspecified · Medium / medium–hard
Printed clock: VARIOUS AIMING POSITION
Printed hardness: MEDIUM, OR MEDIUM TO HARD SHOT · Application source
Clock/hardness prescriptions are the pinned application snapshot; newer book execution revisions may supersede them. Source is shown for review.
Classification confidence: high
Primary: Rail / Diamond Systems
Secondary: Escape / Recovery
Equal-distance one-cushion reference through diamonds; distinguish rolling arrival from the stun reference. Author confirms that this Black kick route also trains escape/recovery: the diagram omits blocking balls, but direct or simpler target access is assumed unavailable.
Shot implementation: Kick Shots · Stun / Follow / Draw · Center ball · Soft / soft–medium
Printed clock: CENTER BALL STUN SHOT
Printed hardness: SOFT, OR SOFT TO MEDIUM SHOT · Application source
Clock/hardness prescriptions are the pinned application snapshot; newer book execution revisions may supersede them. Source is shown for review.
Classification confidence: high
Primary: Rail / Diamond Systems
Secondary: Escape / Recovery
Projected equal-distance reference extends the aiming construction; compare ball state at cushion arrival. Author confirms that this Black kick route also trains escape/recovery: the diagram omits blocking balls, but direct or simpler target access is assumed unavailable.
Shot implementation: Kick Shots · Stun / Follow / Draw · Center ball · Soft / soft–medium
Printed clock: CENTER BALL STUN SHOT
Printed hardness: SOFT, OR SOFT TO MEDIUM SHOT · Application source
Clock/hardness prescriptions are the pinned application snapshot; newer book execution revisions may supersede them. Source is shown for review.
Classification confidence: high
Primary: Rail / Diamond Systems
Secondary: Escape / Recovery
Use the 3.5 spot-on-the-wall reference to construct a one-cushion target route. Author confirms that this Black kick route also trains escape/recovery: the diagram omits blocking balls, but direct or simpler target access is assumed unavailable.
Shot implementation: Kick Shots · Sidespin / English · 1:30 · upper right · 3:00 · right · Medium / medium–hard
Printed clock: 1:30 O'CLOCK SLIGHT TOP RIGHT, 3 O'CLOCK RIGHT SIDE SPIN
Printed hardness: MEDIUM, OR MEDIUM TO HARD SHOT · Application source
Clock/hardness prescriptions are the pinned application snapshot; newer book execution revisions may supersede them. Source is shown for review.
Classification confidence: high
Primary: Rail / Diamond Systems
Secondary: Escape / Recovery
Use the 5.5 wall reference and the author's reverse-sidespin alternative when the side-pocket opening prevents the ordinary route. Author confirms that this Black kick route also trains escape/recovery: the diagram omits blocking balls, but direct or simpler target access is assumed unavailable.
Shot implementation: Kick Shots · Sidespin / English · 1:30 · upper right · 9:00 · left · Medium / medium–hard
Printed clock: 1:30 O'CLOCK SLIGHT TOP RIGHT, 9 O'CLOCK LEFT SIDE SPIN
Printed hardness: MEDIUM, OR MEDIUM TO HARD SHOT · Application source
Clock/hardness prescriptions are the pinned application snapshot; newer book execution revisions may supersede them. Source is shown for review.
Classification confidence: high
Primary: Rail / Diamond Systems
Secondary: Escape / Recovery
Build the 50-percent reference, parallel shift, and half correction for a one-cushion contact. Author confirms that this Black kick route also trains escape/recovery: the diagram omits blocking balls, but direct or simpler target access is assumed unavailable.
Shot implementation: Kick Shots · Stun / Follow / Draw · Center ball · Soft / soft–medium
Printed clock: CENTER BALL STUN SHOT
Printed hardness: SOFT, OR SOFT TO MEDIUM SHOT · Application source
Clock/hardness prescriptions are the pinned application snapshot; newer book execution revisions may supersede them. Source is shown for review.
Classification confidence: high
Primary: Rail / Diamond Systems
Secondary: Escape / Recovery
Midpoint and parallel-line construction supplies the one-cushion aiming point. Author confirms that this Black kick route also trains escape/recovery: the diagram omits blocking balls, but direct or simpler target access is assumed unavailable.
Shot implementation: Kick Shots · Stun / Follow / Draw · Center ball · Soft / soft–medium
Printed clock: CENTER BALL STUN SHOT
Printed hardness: SOFT, OR SOFT TO MEDIUM SHOT · Application source
Clock/hardness prescriptions are the pinned application snapshot; newer book execution revisions may supersede them. Source is shown for review.
Classification confidence: high
Primary: Rail / Diamond Systems
Secondary: Escape / Recovery
Intersect the construction lines to find the cross-point one-cushion reference. Author confirms that this Black kick route also trains escape/recovery: the diagram omits blocking balls, but direct or simpler target access is assumed unavailable.
Shot implementation: Kick Shots · Stun / Follow / Draw · Center ball · Soft / soft–medium
Printed clock: CENTER BALL STUN SHOT
Printed hardness: SOFT, OR SOFT TO MEDIUM SHOT · Application source
Clock/hardness prescriptions are the pinned application snapshot; newer book execution revisions may supersede them. Source is shown for review.
Classification confidence: high
Primary: Rail / Diamond Systems
Secondary: Escape / Recovery
Visualize equal travel distances to locate the one-cushion rebound point. Author confirms that this Black kick route also trains escape/recovery: the diagram omits blocking balls, but direct or simpler target access is assumed unavailable.
Shot implementation: Kick Shots · Stun / Follow / Draw · Center ball · Soft / soft–medium
Printed clock: CENTER BALL STUN SHOT
Printed hardness: SOFT, OR SOFT TO MEDIUM SHOT · Application source
Clock/hardness prescriptions are the pinned application snapshot; newer book execution revisions may supersede them. Source is shown for review.
Classification confidence: high
Primary: Rail / Diamond Systems
Secondary: Aiming Systems · Escape / Recovery
Mirror the required ghost-ball contact across the cushion; the diagram shows intervening balls blocking the direct route. Author confirms that this Black kick route also trains escape/recovery: the diagram omits blocking balls, but direct or simpler target access is assumed unavailable.
Shot implementation: Kick Shots · Stun / Follow / Draw · 12:00 · top · Soft / soft–medium
Printed clock: 12 O'CLOCK FOLLOW SHOT
Printed hardness: SOFT, OR SOFT TO MEDIUM SHOT · Application source
Clock/hardness prescriptions are the pinned application snapshot; newer book execution revisions may supersede them. Source is shown for review.
Classification confidence: high
Primary: Rail / Diamond Systems
Secondary: Escape / Recovery
Midpoint and parallel construction links two cushion contacts before the target. Author confirms that this Black kick route also trains escape/recovery: the diagram omits blocking balls, but direct or simpler target access is assumed unavailable.
Shot implementation: Kick Shots · Multi-Rail Routes · Stun / Follow / Draw · 12:00 · top · Medium / medium–hard
Printed clock: 12 O'CLOCK FOLLOW SHOT
Printed hardness: MEDIUM, OR MEDIUM TO HARD SHOT · Application source
Clock/hardness prescriptions are the pinned application snapshot; newer book execution revisions may supersede them. Source is shown for review.
Classification confidence: high
Primary: Escape / Recovery
Secondary: None
Reach the back of the pocket-side target around intervening balls using the illustrated spin alternatives. Author confirms that this Black kick route also trains escape/recovery: the diagram omits blocking balls, but direct or simpler target access is assumed unavailable.
Shot implementation: Kick Shots · Sidespin / English · 9:00 · left · 3:00 · right · Medium / medium–hard
Printed clock: 9 O'CLOCK LEFT SIDE SPIN, 3 O'CLOCK RIGHT SIDE SPIN
Printed hardness: MEDIUM, OR MEDIUM TO HARD SHOT · Application source
Clock/hardness prescriptions are the pinned application snapshot; newer book execution revisions may supersede them. Source is shown for review.
Classification confidence: high
Primary: Rail / Diamond Systems
Secondary: Escape / Recovery
Two-cushion parallel-line route reaches the corner target when the author's direct late-game route is unavailable. Author confirms that this Black kick route also trains escape/recovery: the diagram omits blocking balls, but direct or simpler target access is assumed unavailable.
Shot implementation: Kick Shots · Multi-Rail Routes · Stun / Follow / Draw · Center ball · Soft / soft–medium
Printed clock: CENTER BALL STUN SHOT
Printed hardness: SOFT, OR SOFT TO MEDIUM SHOT · Application source
Clock/hardness prescriptions are the pinned application snapshot; newer book execution revisions may supersede them. Source is shown for review.
Classification confidence: high
Primary: Carom / Billiard Shots
Secondary: Aiming Systems · Cue-Ball Control · Escape / Recovery
Build the final ghost-ball contact backward through a first object ball; approved copy compares stun/follow/draw and explicitly discusses blocked direct access.
Shot implementation: Stun / Follow / Draw · Various · unspecified · Soft / soft–medium
Printed clock: VARIOUS AIMING POSITION
Printed hardness: SOFT, OR SOFT TO MEDIUM SHOT · Application source
Clock/hardness prescriptions are the pinned application snapshot; newer book execution revisions may supersede them. Source is shown for review.
Classification confidence: high
Primary: Carom / Billiard Shots
Secondary: Cue-Ball Control · Escape / Recovery
Draw back from a first object ball toward the target; progress from straight to angled returns when direct target access is unavailable.
Shot implementation: Stun / Follow / Draw · 6:00 · bottom · Medium / medium–hard
Printed clock: 6 O'CLOCK BACKSPIN/DRAW SHOT
Printed hardness: MEDIUM, OR MEDIUM TO HARD SHOT · Application source
Clock/hardness prescriptions are the pinned application snapshot; newer book execution revisions may supersede them. Source is shown for review.
Classification confidence: high
Primary: Combination Shots
Secondary: Aiming Systems
A truly frozen object-ball pair sends the second ball along its line of centers; short and long destinations expose the aiming tolerance.
Shot implementation: Stun / Follow / Draw · Center ball · Soft / soft–medium
Printed clock: CENTER BALL STUN SHOT
Printed hardness: SOFT, OR SOFT TO MEDIUM SHOT · Application source
Clock/hardness prescriptions are the pinned application snapshot; newer book execution revisions may supersede them. Source is shown for review.
Classification confidence: high
Primary: Combination Shots
Secondary: Aiming Systems
Read the frozen pair's natural center line, then compare left/right sidespin corrections to the second ball's direction.
Shot implementation: Sidespin / English · 9:00 · left · 3:00 · right · Medium / medium–hard
Printed clock: 9 O'CLOCK LEFT SIDE SPIN, 3 O'CLOCK RIGHT SIDE SPIN
Printed hardness: MEDIUM, OR MEDIUM TO HARD SHOT · Application source
Clock/hardness prescriptions are the pinned application snapshot; newer book execution revisions may supersede them. Source is shown for review.
Classification confidence: high
Primary: Rail / Diamond Systems
Secondary: Escape / Recovery
Two-cushion side-pocket route: compare the numbered 1-to-7 reference and its spin alternatives. Author confirms that this Black kick route also trains escape/recovery: the diagram omits blocking balls, but direct or simpler target access is assumed unavailable.
Shot implementation: Kick Shots · Multi-Rail Routes · Sidespin / English · 1:30 · upper right · 3:00 · right · Medium / medium–hard
Printed clock: 1:30 O'CLOCK SLIGHT TOP RIGHT, 3 O'CLOCK RIGHT SIDE SPIN
Printed hardness: MEDIUM, OR MEDIUM TO HARD SHOT · Application source
Clock/hardness prescriptions are the pinned application snapshot; newer book execution revisions may supersede them. Source is shown for review.
Classification confidence: high
Primary: Escape / Recovery
Secondary: None
Long-to-long two-cushion returns compare the illustrated cue contacts. Author confirms that this Black kick route also trains escape/recovery: the diagram omits blocking balls, but direct or simpler target access is assumed unavailable.
Shot implementation: Kick Shots · Multi-Rail Routes · Sidespin / English · Various · unspecified · Medium / medium–hard
Printed clock: VARIOUS AIMING POSITION
Printed hardness: MEDIUM, OR MEDIUM TO HARD SHOT · Application source
Clock/hardness prescriptions are the pinned application snapshot; newer book execution revisions may supersede them. Source is shown for review.
Classification confidence: high
Primary: Escape / Recovery
Secondary: None
Two-cushion routes reach behind the target ball with alternative spin-generated arrivals. Author confirms that this Black kick route also trains escape/recovery: the diagram omits blocking balls, but direct or simpler target access is assumed unavailable.
Shot implementation: Kick Shots · Multi-Rail Routes · Sidespin / English · Stun / Follow / Draw · 12:00 · top · 10:30 · upper left · Medium / medium–hard
Printed clock: 12 O'CLOCK FOLLOW SHOT, 10:30 O'CLOCK SLIGHT TOP LEFT
Printed hardness: MEDIUM, OR MEDIUM TO HARD SHOT · Application source
Clock/hardness prescriptions are the pinned application snapshot; newer book execution revisions may supersede them. Source is shown for review.
Classification confidence: high
Primary: Escape / Recovery
Secondary: None
Compare wider and tighter multi-cushion target routes using the displayed spin options. Author confirms that this Black kick route also trains escape/recovery: the diagram omits blocking balls, but direct or simpler target access is assumed unavailable.
Shot implementation: Kick Shots · Multi-Rail Routes · Sidespin / English · 1:30 · upper right · 3:00 · right · Medium / medium–hard
Printed clock: 1:30 O'CLOCK SLIGHT TOP RIGHT, 3 O'CLOCK RIGHT SIDE SPIN
Printed hardness: MEDIUM, OR MEDIUM TO HARD SHOT · Application source
Clock/hardness prescriptions are the pinned application snapshot; newer book execution revisions may supersede them. Source is shown for review.
Classification confidence: high
Primary: Bank Shots
Secondary: Rail / Diamond Systems
Bank behind the side pocket using the author's baseline and interpolation reference.
Shot implementation: Stun / Follow / Draw · Center ball · Soft / soft–medium
Printed clock: CENTER BALL STUN SHOT
Printed hardness: SOFT, OR SOFT TO MEDIUM SHOT · Application source
Clock/hardness prescriptions are the pinned application snapshot; newer book execution revisions may supersede them. Source is shown for review.
Classification confidence: high
Primary: Rail / Diamond Systems
Secondary: Escape / Recovery
Short-cushion kick uses the revised upper-sidespin 1-to-1 baseline and 2-to-1 adjustment. Author confirms that this Black kick route also trains escape/recovery: the diagram omits blocking balls, but direct or simpler target access is assumed unavailable.
Shot implementation: Kick Shots · Sidespin / English · Stun / Follow / Draw · 12:00 · top · Medium / medium–hard
Printed clock: 12 O'CLOCK FOLLOW SHOT
Printed hardness: MEDIUM, OR MEDIUM TO HARD SHOT · Application source
Clock/hardness prescriptions are the pinned application snapshot; newer book execution revisions may supersede them. Source is shown for review.
Classification confidence: high
Primary: Escape / Recovery
Secondary: None
Reverse sidespin changes the returning kick line; compare the depicted contacts instead of treating reverse English as draw. Author confirms that this Black kick route also trains escape/recovery: the diagram omits blocking balls, but direct or simpler target access is assumed unavailable.
Shot implementation: Kick Shots · Sidespin / English · 10:30 · upper left · 9:00 · left · Medium / medium–hard
Printed clock: 10:30 O'CLOCK SLIGHT TOP LEFT, 9 O'CLOCK LEFT SIDE SPIN
Printed hardness: MEDIUM, OR MEDIUM TO HARD SHOT · Application source
Clock/hardness prescriptions are the pinned application snapshot; newer book execution revisions may supersede them. Source is shown for review.
Classification confidence: high
Primary: Escape / Recovery
Secondary: None
Compare broad and tight spin-shaped routes and the direction after the second cushion. Author confirms that this Black kick route also trains escape/recovery: the diagram omits blocking balls, but direct or simpler target access is assumed unavailable.
Shot implementation: Kick Shots · Sidespin / English · Multi-Rail Routes · 1:30 · upper right · 9:00 · left · Medium / medium–hard
Printed clock: 1:30 O'CLOCK SLIGHT TOP RIGHT, 9 O'CLOCK LEFT SIDE SPIN
Printed hardness: MEDIUM, OR MEDIUM TO HARD SHOT · Application source
Clock/hardness prescriptions are the pinned application snapshot; newer book execution revisions may supersede them. Source is shown for review.
Classification confidence: high
Primary: Rail / Diamond Systems
Secondary: Escape / Recovery
Numbered two-cushion system connects the starting reference to the target through two cushions. Author confirms that this Black kick route also trains escape/recovery: the diagram omits blocking balls, but direct or simpler target access is assumed unavailable.
Shot implementation: Kick Shots · Multi-Rail Routes · Sidespin / English · 10:30 · upper left · Soft / soft–medium
Printed clock: 10:30 O'CLOCK SLIGHT TOP LEFT
Printed hardness: SOFT, OR SOFT TO MEDIUM SHOT · Application source
Clock/hardness prescriptions are the pinned application snapshot; newer book execution revisions may supersede them. Source is shown for review.
Classification confidence: high
Primary: Rail / Diamond Systems
Secondary: Escape / Recovery
Two-cushion system compares standard/full sidespin; approved explanation supplies an alternative when the normal route is obstructed. Author confirms that this Black kick route also trains escape/recovery: the diagram omits blocking balls, but direct or simpler target access is assumed unavailable.
Shot implementation: Kick Shots · Multi-Rail Routes · Sidespin / English · 10:30 · upper left · 9:00 · left · Soft / soft–medium
Printed clock: 10:30 O'CLOCK SLIGHT TOP LEFT, 9 O'CLOCK LEFT SIDE SPIN
Printed hardness: SOFT, OR SOFT TO MEDIUM SHOT · Application source
Clock/hardness prescriptions are the pinned application snapshot; newer book execution revisions may supersede them. Source is shown for review.
Classification confidence: high
Primary: Rail / Diamond Systems
Secondary: Escape / Recovery
Two-cushion calculation compares the standard and full-sidespin alternatives. Author confirms that this Black kick route also trains escape/recovery: the diagram omits blocking balls, but direct or simpler target access is assumed unavailable.
Shot implementation: Kick Shots · Multi-Rail Routes · Sidespin / English · 10:30 · upper left · Soft / soft–medium
Printed clock: 10:30 O'CLOCK SLIGHT TOP LEFT
Printed hardness: SOFT, OR SOFT TO MEDIUM SHOT · Application source
Clock/hardness prescriptions are the pinned application snapshot; newer book execution revisions may supersede them. Source is shown for review.
Classification confidence: high
Primary: Rail / Diamond Systems
Secondary: Escape / Recovery
Use the corrected off-rail aiming point for the two-cushion system; it is not a universal half-diamond shift. Author confirms that this Black kick route also trains escape/recovery: the diagram omits blocking balls, but direct or simpler target access is assumed unavailable.
Shot implementation: Kick Shots · Multi-Rail Routes · Sidespin / English · 9:00 · left · Soft / soft–medium
Printed clock: 9 O'CLOCK LEFT SIDE SPIN
Printed hardness: SOFT, OR SOFT TO MEDIUM SHOT · Application source
Clock/hardness prescriptions are the pinned application snapshot; newer book execution revisions may supersede them. Source is shown for review.
Classification confidence: medium · Author review required
Latest corrected off-rail aiming reference supersedes older half-diamond/generalized numbering language. Verify source synchronization.
Primary: Rail / Diamond Systems
Secondary: Escape / Recovery
One-cushion 3.5 Plus route compares standard/full sidespin; the latest author revision supersedes the old backspin artwork. Author confirms that this Black kick route also trains escape/recovery: the diagram omits blocking balls, but direct or simpler target access is assumed unavailable.
Shot implementation: Kick Shots · Sidespin / English · 1:30 · upper right · Soft / soft–medium
Printed clock: 1:30 O'CLOCK SLIGHT TOP RIGHT
Printed hardness: SOFT, OR SOFT TO MEDIUM SHOT · Application source
Clock/hardness prescriptions are the pinned application snapshot; newer book execution revisions may supersede them. Source is shown for review.
Latest author revision removes the older backspin variant. Confirm the app artwork is synchronized; use the revised sidespin/system interpretation.
Classification confidence: medium · Author review required
Latest author revision removes the older backspin variant. Confirm the app artwork is synchronized; use the revised sidespin/system interpretation. Withheld: Stun / Follow / Draw.
Primary: Rail / Diamond Systems
Secondary: Escape / Recovery
One-cushion 3.5 Plus construction compares spin-specific aiming references. Author confirms that this Black kick route also trains escape/recovery: the diagram omits blocking balls, but direct or simpler target access is assumed unavailable.
Shot implementation: Kick Shots · Sidespin / English · 1:30 · upper right · 3:00 · right · Soft / soft–medium
Printed clock: 1:30 O'CLOCK SLIGHT TOP RIGHT, 3 O'CLOCK RIGHT SIDE SPIN
Printed hardness: SOFT, OR SOFT TO MEDIUM SHOT · Application source
Clock/hardness prescriptions are the pinned application snapshot; newer book execution revisions may supersede them. Source is shown for review.
Classification confidence: high
Primary: Rail / Diamond Systems
Secondary: Escape / Recovery
One-cushion 3.5 Plus route includes the side-pocket opening constraint and an adjusted spin reference. Author confirms that this Black kick route also trains escape/recovery: the diagram omits blocking balls, but direct or simpler target access is assumed unavailable.
Shot implementation: Kick Shots · Sidespin / English · 1:30 · upper right · Soft / soft–medium
Printed clock: 1:30 O'CLOCK SLIGHT TOP RIGHT
Printed hardness: SOFT, OR SOFT TO MEDIUM SHOT · Application source
Clock/hardness prescriptions are the pinned application snapshot; newer book execution revisions may supersede them. Source is shown for review.
Classification confidence: medium · Author review required
Latest author correction identifies the side-pocket opening, while older notes say corner pocket. Classification uses the latest correction.
Primary: Rail / Diamond Systems
Secondary: Escape / Recovery
One-cushion 3.5 Plus target calculation uses the matching spin-specific route. Author confirms that this Black kick route also trains escape/recovery: the diagram omits blocking balls, but direct or simpler target access is assumed unavailable.
Shot implementation: Kick Shots · Sidespin / English · 1:30 · upper right · 3:00 · right · Soft / soft–medium
Printed clock: 1:30 O'CLOCK SLIGHT TOP RIGHT, 3 O'CLOCK RIGHT SIDE SPIN
Printed hardness: SOFT, OR SOFT TO MEDIUM SHOT · Application source
Clock/hardness prescriptions are the pinned application snapshot; newer book execution revisions may supersede them. Source is shown for review.
Classification confidence: high
Primary: Rail / Diamond Systems
Secondary: Escape / Recovery
Two-cushion 11 Minus route compares the ordinary and full-inner-sidespin alternatives. Author confirms that this Black kick route also trains escape/recovery: the diagram omits blocking balls, but direct or simpler target access is assumed unavailable.
Shot implementation: Kick Shots · Multi-Rail Routes · Sidespin / English · 1:30 · upper right · Medium / medium–hard
Printed clock: 1:30 O'CLOCK SLIGHT TOP RIGHT
Printed hardness: MEDIUM, OR MEDIUM TO HARD SHOT · Application source
Clock/hardness prescriptions are the pinned application snapshot; newer book execution revisions may supersede them. Source is shown for review.
Classification confidence: high
Primary: Rail / Diamond Systems
Secondary: Escape / Recovery
Two-cushion 11 Minus calculation changes with the illustrated full-inner-sidespin alternative. Author confirms that this Black kick route also trains escape/recovery: the diagram omits blocking balls, but direct or simpler target access is assumed unavailable.
Shot implementation: Kick Shots · Multi-Rail Routes · Sidespin / English · 1:30 · upper right · Medium / medium–hard
Printed clock: 1:30 O'CLOCK SLIGHT TOP RIGHT
Printed hardness: MEDIUM, OR MEDIUM TO HARD SHOT · Application source
Clock/hardness prescriptions are the pinned application snapshot; newer book execution revisions may supersede them. Source is shown for review.
Classification confidence: high
Primary: Rail / Diamond Systems
Secondary: Escape / Recovery
Follow the numbered 11 Minus aiming construction through two cushions to the target. Author confirms that this Black kick route also trains escape/recovery: the diagram omits blocking balls, but direct or simpler target access is assumed unavailable.
Shot implementation: Kick Shots · Multi-Rail Routes · Sidespin / English · 1:30 · upper right · 3:00 · right · Medium / medium–hard
Printed clock: 1:30 O'CLOCK SLIGHT TOP RIGHT, 3 O'CLOCK RIGHT SIDE SPIN
Printed hardness: MEDIUM, OR MEDIUM TO HARD SHOT · Application source
Clock/hardness prescriptions are the pinned application snapshot; newer book execution revisions may supersede them. Source is shown for review.
Classification confidence: high
Primary: Rail / Diamond Systems
Secondary: Escape / Recovery
Two-cushion 11 Minus continuation compares the standard/full-inner-sidespin reference. Author confirms that this Black kick route also trains escape/recovery: the diagram omits blocking balls, but direct or simpler target access is assumed unavailable.
Shot implementation: Kick Shots · Multi-Rail Routes · Sidespin / English · 1:30 · upper right · 3:00 · right · Medium / medium–hard
Printed clock: 1:30 O'CLOCK SLIGHT TOP RIGHT, 3 O'CLOCK RIGHT SIDE SPIN
Printed hardness: MEDIUM, OR MEDIUM TO HARD SHOT · Application source
Clock/hardness prescriptions are the pinned application snapshot; newer book execution revisions may supersede them. Source is shown for review.
Classification confidence: high
Primary: Rail / Diamond Systems
Secondary: Escape / Recovery
Three-cushion 6 Plus route compares standard and stronger sidespin references. Author confirms that this Black kick route also trains escape/recovery: the diagram omits blocking balls, but direct or simpler target access is assumed unavailable.
Shot implementation: Kick Shots · Multi-Rail Routes · Sidespin / English · 1:30 · upper right · 3:00 · right · Medium / medium–hard
Printed clock: 1:30 O'CLOCK SLIGHT TOP RIGHT, 3 O'CLOCK RIGHT SIDE SPIN
Printed hardness: MEDIUM, OR MEDIUM TO HARD SHOT · Application source
Clock/hardness prescriptions are the pinned application snapshot; newer book execution revisions may supersede them. Source is shown for review.
Classification confidence: high
Primary: Rail / Diamond Systems
Secondary: Escape / Recovery
Use the numbered three-cushion 6 Plus construction and its spin-specific alternative. Author confirms that this Black kick route also trains escape/recovery: the diagram omits blocking balls, but direct or simpler target access is assumed unavailable.
Shot implementation: Kick Shots · Multi-Rail Routes · Sidespin / English · 1:30 · upper right · 3:00 · right · Medium / medium–hard
Printed clock: 1:30 O'CLOCK SLIGHT TOP RIGHT, 3 O'CLOCK RIGHT SIDE SPIN
Printed hardness: MEDIUM, OR MEDIUM TO HARD SHOT · Application source
Clock/hardness prescriptions are the pinned application snapshot; newer book execution revisions may supersede them. Source is shown for review.
Classification confidence: high
Primary: Rail / Diamond Systems
Secondary: Escape / Recovery
Three-cushion 6 Plus calculation controls arrival; a defensive application is mentioned but no specific safety leave is established here. Author confirms that this Black kick route also trains escape/recovery: the diagram omits blocking balls, but direct or simpler target access is assumed unavailable.
Shot implementation: Kick Shots · Multi-Rail Routes · Sidespin / English · 1:30 · upper right · 3:00 · right · Medium / medium–hard
Printed clock: 1:30 O'CLOCK SLIGHT TOP RIGHT, 3 O'CLOCK RIGHT SIDE SPIN
Printed hardness: MEDIUM, OR MEDIUM TO HARD SHOT · Application source
Clock/hardness prescriptions are the pinned application snapshot; newer book execution revisions may supersede them. Source is shown for review.
Classification confidence: medium · Author review required
Author mentions defensive transfer, but a particular safety leave is not specified. Keep safety withheld unless the intended tactical example is confirmed. Withheld: Defensive / Safety Play.
Primary: Rail / Diamond Systems
Secondary: Escape / Recovery
Three-cushion route compares the standard 6 Plus and distinct 5-based alternative; do not interchange their formulas. Author confirms that this Black kick route also trains escape/recovery: the diagram omits blocking balls, but direct or simpler target access is assumed unavailable.
Shot implementation: Kick Shots · Multi-Rail Routes · Sidespin / English · 3:00 · right · Medium / medium–hard
Printed clock: 3 O'CLOCK RIGHT SIDE SPIN
Printed hardness: MEDIUM, OR MEDIUM TO HARD SHOT · Application source
Clock/hardness prescriptions are the pinned application snapshot; newer book execution revisions may supersede them. Source is shown for review.
Classification confidence: high
Primary: Aiming Systems
Secondary: None
One-diamond frozen long-rail target: use the ball-edge reference for the rail-first contact.
Shot implementation: Kick Shots · Stun / Follow / Draw · Center ball · Soft / soft–medium
Printed clock: CENTER BALL STUN SHOT
Printed hardness: SOFT, OR SOFT TO MEDIUM SHOT · Application source
Classification confidence: high
Primary: Aiming Systems
Secondary: None
At 1.5 diamonds, the outside-edge reference and sidespin correction guide the frozen-rail kick.
Shot implementation: Kick Shots · Sidespin / English · 3:00 · right · Medium / medium–hard
Printed clock: 3 O'CLOCK RIGHT SIDE SPIN
Printed hardness: MEDIUM, OR MEDIUM TO HARD SHOT · Application source
Classification confidence: high
Primary: Aiming Systems
Secondary: None
At two diamonds, use the imaginary chalk-center reference to reach the frozen long-rail ball.
Shot implementation: Kick Shots · Stun / Follow / Draw · Center ball · Medium / medium–hard
Printed clock: CENTER BALL STUN SHOT
Printed hardness: MEDIUM, OR MEDIUM TO HARD SHOT · Application source
Classification confidence: high
Primary: Aiming Systems
Secondary: None
At 2.5 diamonds, the far edge of the chalk reference locates the frozen-ball kick line.
Shot implementation: Kick Shots · Stun / Follow / Draw · Center ball · Medium / medium–hard
Printed clock: CENTER BALL STUN SHOT
Printed hardness: MEDIUM, OR MEDIUM TO HARD SHOT · Application source
Classification confidence: high
Primary: Aiming Systems
Secondary: None
Short-cushion frozen-ball kick from the two-diamond starting reference uses the illustrated edge alignment.
Shot implementation: Kick Shots · Stun / Follow / Draw · Center ball · Medium / medium–hard
Printed clock: CENTER BALL STUN SHOT
Printed hardness: MEDIUM, OR MEDIUM TO HARD SHOT · Application source
Classification confidence: high
Primary: Aiming Systems
Secondary: None
Short-cushion frozen-ball kick from 2.5 diamonds changes the local edge reference.
Shot implementation: Kick Shots · Stun / Follow / Draw · Center ball · Medium / medium–hard
Printed clock: CENTER BALL STUN SHOT
Printed hardness: MEDIUM, OR MEDIUM TO HARD SHOT · Application source
Classification confidence: high
Primary: Aiming Systems
Secondary: None
Three-diamond short-cushion frozen target uses an edge alignment; the conflicting cue-contact instructions are excluded from additional tags.
Shot implementation: Kick Shots · Stun / Follow / Draw · Center ball · Medium / medium–hard
Printed clock: CENTER BALL STUN SHOT
Printed hardness: MEDIUM, OR MEDIUM TO HARD SHOT · Application source
Cue-contact metadata and artwork disagree. Confirm the intended spin before adding a spin association.
Classification confidence: medium · Author review required
Cue-contact metadata and artwork disagree. Confirm the intended spin before adding a spin association. Withheld: Sidespin / English.
Primary: Aiming Systems
Secondary: None
Chalk-fraction aiming reference calibrates the short-cushion frozen-ball kick at three diamonds.
Shot implementation: Kick Shots · Stun / Follow / Draw · Center ball · Medium / medium–hard
Printed clock: CENTER BALL STUN SHOT
Printed hardness: MEDIUM, OR MEDIUM TO HARD SHOT · Application source
Classification confidence: high
Primary: Aiming Systems
Secondary: None
Cue ball contacts the cushion before the frozen ball; edge alignment controls the across-table result, not an established object-ball bank.
Shot implementation: Kick Shots · Stun / Follow / Draw · Center ball · Medium / medium–hard
Printed clock: CENTER BALL STUN SHOT
Printed hardness: MEDIUM, OR MEDIUM TO HARD SHOT · Application source
Classification confidence: medium · Author review required
Cross-bank title accompanies rail-first cue-ball geometry. Recommend kick; confirm whether an object-ball bank is actually intended. Withheld: Bank Shots.
Primary: Aiming Systems
Secondary: None
The alternate frozen-ball cross-table layout uses rail-first contact and a local edge aiming reference.
Shot implementation: Kick Shots · Stun / Follow / Draw · Center ball · Medium / medium–hard
Printed clock: CENTER BALL STUN SHOT
Printed hardness: MEDIUM, OR MEDIUM TO HARD SHOT · Application source
Classification confidence: medium · Author review required
Cross-bank title accompanies rail-first cue-ball geometry. Recommend kick; confirm whether an object-ball bank is actually intended. Withheld: Bank Shots.
Primary: Aiming Systems
Secondary: None
Farther frozen-target cross-table arrangement still begins cue-ball-to-cushion; align the indicated contact reference.
Shot implementation: Kick Shots · Stun / Follow / Draw · Center ball · Medium / medium–hard
Printed clock: CENTER BALL STUN SHOT
Printed hardness: MEDIUM, OR MEDIUM TO HARD SHOT · Application source
Classification confidence: medium · Author review required
Cross-bank title accompanies rail-first cue-ball geometry. Recommend kick; confirm whether an object-ball bank is actually intended. Withheld: Bank Shots.
Primary: Aiming Systems
Secondary: None
The fourth frozen-target arrangement changes the reference alignment for a rail-first contact.
Shot implementation: Kick Shots · Stun / Follow / Draw · Center ball · Medium / medium–hard
Printed clock: CENTER BALL STUN SHOT
Printed hardness: MEDIUM, OR MEDIUM TO HARD SHOT · Application source
Classification confidence: medium · Author review required
Cross-bank title accompanies rail-first cue-ball geometry. Recommend kick; confirm whether an object-ball bank is actually intended. Withheld: Bank Shots.
Primary: Carom / Billiard Shots
Secondary: Aiming Systems
Rail-first billiard example uses a cushion before the target; the carom-family label and contact order need author confirmation.
Shot implementation: Kick Shots · Stun / Follow / Draw · Center ball · Soft / soft–medium
Printed clock: CENTER BALL STUN SHOT
Printed hardness: SOFT, OR SOFT TO MEDIUM SHOT · Application source
Classification confidence: low · Author review required
The rail-first route is clear, but the carom-family label does not establish a first-object-ball continuation. Confirm primary carom versus kick.
Primary: Carom / Billiard Shots
Secondary: Cue-Ball Control
A first object-ball contact redirects the cue ball through the cushion toward the final target.
Shot implementation: Stun / Follow / Draw · Center ball · Medium / medium–hard
Printed clock: CENTER BALL STUN SHOT
Printed hardness: MEDIUM, OR MEDIUM TO HARD SHOT · Application source
Classification confidence: high
Primary: Carom / Billiard Shots
Secondary: Aiming Systems
Several off-ball/off-rail layouts use contact geometry to redirect the cue ball to another target.
Shot implementation: Stun / Follow / Draw · Center ball · Soft / soft–medium
Printed clock: CENTER BALL STUN SHOT
Printed hardness: SOFT, OR SOFT TO MEDIUM SHOT · Application source
Classification confidence: high
Primary: Carom / Billiard Shots
Secondary: Aiming Systems
Edge-to-edge alignment provides a visual starting contact for the carom route.
Shot implementation: Stun / Follow / Draw · Center ball · Medium / medium–hard
Printed clock: CENTER BALL STUN SHOT
Printed hardness: MEDIUM, OR MEDIUM TO HARD SHOT · Application source
Classification confidence: high
Primary: Rail / Diamond Systems
Secondary: None
Cross-table one-cushion 3.5 reference equates the indicated start and arrival distances.
Shot implementation: Kick Shots · Stun / Follow / Draw · Center ball · Soft / soft–medium
Printed clock: CENTER BALL STUN SHOT
Printed hardness: SOFT, OR SOFT TO MEDIUM SHOT · Application source
Classification confidence: high
Primary: Rail / Diamond Systems
Secondary: None
One-cushion 3.5 construction solves the target-zero cross-table route.
Shot implementation: Kick Shots · Stun / Follow / Draw · Center ball · Soft / soft–medium
Printed clock: CENTER BALL STUN SHOT
Printed hardness: SOFT, OR SOFT TO MEDIUM SHOT · Application source
Classification confidence: high
Primary: Rail / Diamond Systems
Secondary: None
One-cushion 3.5 construction solves the target-one cross-table route.
Shot implementation: Kick Shots · Stun / Follow / Draw · Center ball · Soft / soft–medium
Printed clock: CENTER BALL STUN SHOT
Printed hardness: SOFT, OR SOFT TO MEDIUM SHOT · Application source
Classification confidence: high
Primary: Rail / Diamond Systems
Secondary: None
One-cushion 3.5 construction solves the target-two cross-table route.
Shot implementation: Kick Shots · Stun / Follow / Draw · Center ball · Soft / soft–medium
Printed clock: CENTER BALL STUN SHOT
Printed hardness: SOFT, OR SOFT TO MEDIUM SHOT · Application source
Classification confidence: high
Primary: Rail / Diamond Systems
Secondary: None
One-cushion 3.5 construction extends to the target-three cross-table route.
Shot implementation: Kick Shots · Stun / Follow / Draw · Center ball · Medium / medium–hard
Printed clock: CENTER BALL STUN SHOT
Printed hardness: MEDIUM, OR MEDIUM TO HARD SHOT · Application source
Classification confidence: high
Primary: Rail / Diamond Systems
Secondary: None
The full-sidespin 3-diamond cross-table reference is a distinct delivery alternative to the 3.5 baseline.
Shot implementation: Kick Shots · Sidespin / English · 1:30 · upper right · Medium / medium–hard
Printed clock: 1:30 O'CLOCK SLIGHT TOP RIGHT
Printed hardness: MEDIUM, OR MEDIUM TO HARD SHOT · Application source
Classification confidence: high
Primary: Rail / Diamond Systems
Secondary: None
Alternate full-sidespin 3-diamond route changes the start-to-target relationship.
Shot implementation: Kick Shots · Sidespin / English · 3:00 · right · Medium / medium–hard
Printed clock: 3 O'CLOCK RIGHT SIDE SPIN
Printed hardness: MEDIUM, OR MEDIUM TO HARD SHOT · Application source
Classification confidence: high
Primary: Rail / Diamond Systems
Secondary: None
Cross-table numbered one-cushion route is clear, but the title's 3.5 reference conflicts with the artwork's 3.0 label.
Shot implementation: Kick Shots · Stun / Follow / Draw · Center ball · Medium / medium–hard
Printed clock: CENTER BALL STUN SHOT
Printed hardness: MEDIUM, OR MEDIUM TO HARD SHOT · Application source
Classification confidence: medium · Author review required
Title says 3.5 but artwork labels 3.0. Confirm the intended system reference; kick and rail-system families remain evident.
Primary: Rail / Diamond Systems
Secondary: None
Two-cushion aiming calculation uses the displayed 5 minus 3 equals 2 reference.
Shot implementation: Kick Shots · Multi-Rail Routes · Stun / Follow / Draw · Center ball · 6:00 · bottom · Soft / soft–medium
Printed clock: CENTER BALL STUN SHOT, 6 O'CLOCK BACKSPIN/DRAW SHOT
Printed hardness: SOFT, OR SOFT TO MEDIUM SHOT · Application source
Classification confidence: high
Primary: Rail / Diamond Systems
Secondary: None
Current two-cushion artwork shows 4.5 minus 3 equals 1.5; older conflicting copy is superseded for this classification.
Shot implementation: Kick Shots · Multi-Rail Routes · Stun / Follow / Draw · Center ball · 6:00 · bottom · Soft / soft–medium
Printed clock: CENTER BALL STUN SHOT, 6 O'CLOCK BACKSPIN/DRAW SHOT
Printed hardness: SOFT, OR SOFT TO MEDIUM SHOT · Application source
Classification confidence: high
Primary: Rail / Diamond Systems
Secondary: None
Two-cushion construction follows 6 minus 3 equals 3.
Shot implementation: Kick Shots · Multi-Rail Routes · Stun / Follow / Draw · Center ball · 6:00 · bottom · Soft / soft–medium
Printed clock: CENTER BALL STUN SHOT, 6 O'CLOCK BACKSPIN/DRAW SHOT
Printed hardness: SOFT, OR SOFT TO MEDIUM SHOT · Application source
Classification confidence: high
Primary: Rail / Diamond Systems
Secondary: None
Two-cushion construction follows 7 minus 3 equals 4.
Shot implementation: Kick Shots · Multi-Rail Routes · Stun / Follow / Draw · Center ball · 6:00 · bottom · Soft / soft–medium
Printed clock: CENTER BALL STUN SHOT, 6 O'CLOCK BACKSPIN/DRAW SHOT
Printed hardness: SOFT, OR SOFT TO MEDIUM SHOT · Application source
Classification confidence: high
Primary: Rail / Diamond Systems
Secondary: None
The two-cushion numbered route is clear; the printed 5 minus 2.5 equals 3 arithmetic requires correction by the author.
Shot implementation: Kick Shots · Multi-Rail Routes · Stun / Follow / Draw · 6:00 · bottom · Medium / medium–hard
Printed clock: 6 O'CLOCK BACKSPIN/DRAW SHOT
Printed hardness: MEDIUM, OR MEDIUM TO HARD SHOT · Application source
Classification confidence: medium · Author review required
Artwork arithmetic reads 5 − 2.5 = 3. Confirm the intended numbers/aim point. This is a classification, not validation of the formula.
Primary: Rail / Diamond Systems
Secondary: None
Two-cushion construction follows 4.5 minus 2.5 equals 2.
Shot implementation: Kick Shots · Multi-Rail Routes · Stun / Follow / Draw · 6:00 · bottom · Medium / medium–hard
Printed clock: 6 O'CLOCK BACKSPIN/DRAW SHOT
Printed hardness: MEDIUM, OR MEDIUM TO HARD SHOT · Application source
Classification confidence: high
Primary: Rail / Diamond Systems
Secondary: None
Two-cushion calculation is visible, but draw metadata conflicts with the center/outside-sidespin variants; spin tags are withheld.
Shot implementation: Kick Shots · Multi-Rail Routes · Stun / Follow / Draw · 6:00 · bottom · Medium / medium–hard
Printed clock: 6 O'CLOCK BACKSPIN/DRAW SHOT
Printed hardness: MEDIUM, OR MEDIUM TO HARD SHOT · Application source
Draw metadata disagrees with center/outside-sidespin illustrated alternatives. Withhold additional spin tags.
Classification confidence: medium · Author review required
Draw metadata disagrees with center/outside-sidespin illustrated alternatives. Withhold additional spin tags. Withheld: Sidespin / English, Stun / Follow / Draw.
Primary: Rail / Diamond Systems
Secondary: None
Two-cushion construction follows 7 minus 2.5 equals 4.5.
Shot implementation: Kick Shots · Multi-Rail Routes · Stun / Follow / Draw · 6:00 · bottom · Medium / medium–hard
Printed clock: 6 O'CLOCK BACKSPIN/DRAW SHOT
Printed hardness: MEDIUM, OR MEDIUM TO HARD SHOT · Application source
Classification confidence: high
Primary: Rail / Diamond Systems
Secondary: None
Two-cushion aiming reference uses 4.5 minus 2 equals 2.5.
Shot implementation: Kick Shots · Multi-Rail Routes · Stun / Follow / Draw · 6:00 · bottom · Soft / soft–medium
Printed clock: 6 O'CLOCK BACKSPIN/DRAW SHOT
Printed hardness: SOFT, OR SOFT TO MEDIUM SHOT · Application source
Classification confidence: high
Primary: Rail / Diamond Systems
Secondary: None
Two-cushion aiming reference uses 6 minus 4 equals 2.
Shot implementation: Kick Shots · Multi-Rail Routes · Stun / Follow / Draw · 6:00 · bottom · Soft / soft–medium
Printed clock: 6 O'CLOCK BACKSPIN/DRAW SHOT
Printed hardness: SOFT, OR SOFT TO MEDIUM SHOT · Application source
Classification confidence: high
Primary: Rail / Diamond Systems
Secondary: None
Two-cushion aiming reference uses 7 minus 4.5 equals 2.5.
Shot implementation: Kick Shots · Multi-Rail Routes · Stun / Follow / Draw · Center ball · 6:00 · bottom · Soft / soft–medium
Printed clock: CENTER BALL STUN SHOT, 6 O'CLOCK BACKSPIN/DRAW SHOT
Printed hardness: SOFT, OR SOFT TO MEDIUM SHOT · Application source
Classification confidence: high
Primary: Rail / Diamond Systems
Secondary: None
Two-cushion route has a plotted point at 3 versus the printed calculation's result 2; count the system family, not a validated formula.
Shot implementation: Kick Shots · Multi-Rail Routes · Stun / Follow / Draw · Center ball · Soft / soft–medium
Printed clock: CENTER BALL STUN SHOT
Printed hardness: SOFT, OR SOFT TO MEDIUM SHOT · Application source
Classification confidence: medium · Author review required
Plotted aiming point 3 disagrees with the printed 7 − 5 = 2 result. Confirm route calibration.
Primary: Purpose awaiting review
Secondary: None
Corner-pocket route fan compares spin-shaped one-cushion arrivals from the spade layout.
Implementation is documented, but a separate training purpose has not yet been assigned. Author review needed; no escape/defense purpose inferred.
Shot implementation: Kick Shots · Sidespin / English · Various · unspecified · Soft through medium–hard
Printed clock: VARIOUS AIMING POSITION
Printed hardness: SOFT, OR SOFT TO MEDIUM SHOT, MEDIUM, OR MEDIUM TO HARD SHOT · Application source
Classification confidence: high
Primary: Purpose awaiting review
Secondary: None
Corner-pocket route fan compares different cue contacts from the club starting layout.
Implementation is documented, but a separate training purpose has not yet been assigned. Author review needed; no escape/defense purpose inferred.
Shot implementation: Kick Shots · Sidespin / English · Various · unspecified · Soft through medium–hard
Printed clock: VARIOUS AIMING POSITION
Printed hardness: SOFT, OR SOFT TO MEDIUM SHOT, MEDIUM, OR MEDIUM TO HARD SHOT · Application source
Classification confidence: high
Primary: Purpose awaiting review
Secondary: None
Diamond-layout corner-pocket kick compares the available spin-shaped returning lines.
Implementation is documented, but a separate training purpose has not yet been assigned. Author review needed; no escape/defense purpose inferred.
Shot implementation: Kick Shots · Sidespin / English · Various · unspecified · Soft through medium–hard
Printed clock: VARIOUS AIMING POSITION
Printed hardness: SOFT, OR SOFT TO MEDIUM SHOT, MEDIUM, OR MEDIUM TO HARD SHOT · Application source
Classification confidence: high
Primary: Purpose awaiting review
Secondary: None
Heart-layout corner-pocket kick uses alternative spin delivery to change arrival.
Implementation is documented, but a separate training purpose has not yet been assigned. Author review needed; no escape/defense purpose inferred.
Shot implementation: Kick Shots · Sidespin / English · Various · unspecified · Soft through medium–hard
Printed clock: VARIOUS AIMING POSITION
Printed hardness: SOFT, OR SOFT TO MEDIUM SHOT, MEDIUM, OR MEDIUM TO HARD SHOT · Application source
Classification confidence: high
Primary: Purpose awaiting review
Secondary: None
Queen-spade corner-target arrangement compares alternate spin-generated kick lines.
Implementation is documented, but a separate training purpose has not yet been assigned. Author review needed; no escape/defense purpose inferred.
Shot implementation: Kick Shots · Sidespin / English · Various · unspecified · Soft through medium–hard
Printed clock: VARIOUS AIMING POSITION
Printed hardness: SOFT, OR SOFT TO MEDIUM SHOT, MEDIUM, OR MEDIUM TO HARD SHOT · Application source
Classification confidence: high
Primary: Purpose awaiting review
Secondary: None
Queen-club corner-target arrangement changes the returning route with cue contact.
Implementation is documented, but a separate training purpose has not yet been assigned. Author review needed; no escape/defense purpose inferred.
Shot implementation: Kick Shots · Sidespin / English · Various · unspecified · Soft through medium–hard
Printed clock: VARIOUS AIMING POSITION
Printed hardness: SOFT, OR SOFT TO MEDIUM SHOT, MEDIUM, OR MEDIUM TO HARD SHOT · Application source
Classification confidence: high
Primary: Purpose awaiting review
Secondary: None
Queen-diamond arrangement compares spin alternatives for the corner-pocket target.
Implementation is documented, but a separate training purpose has not yet been assigned. Author review needed; no escape/defense purpose inferred.
Shot implementation: Kick Shots · Sidespin / English · Various · unspecified · Soft through medium–hard
Printed clock: VARIOUS AIMING POSITION
Printed hardness: SOFT, OR SOFT TO MEDIUM SHOT, MEDIUM, OR MEDIUM TO HARD SHOT · Application source
Classification confidence: high
Primary: Purpose awaiting review
Secondary: None
Queen-heart arrangement compares the illustrated returning kick paths and cue contacts.
Implementation is documented, but a separate training purpose has not yet been assigned. Author review needed; no escape/defense purpose inferred.
Shot implementation: Kick Shots · Sidespin / English · Various · unspecified · Soft through medium–hard
Printed clock: VARIOUS AIMING POSITION
Printed hardness: SOFT, OR SOFT TO MEDIUM SHOT, MEDIUM, OR MEDIUM TO HARD SHOT · Application source
Classification confidence: high
Primary: Purpose awaiting review
Secondary: None
King-spade arrangement extends the corner-target kick route family with alternate spin contacts.
Implementation is documented, but a separate training purpose has not yet been assigned. Author review needed; no escape/defense purpose inferred.
Shot implementation: Kick Shots · Sidespin / English · Various · unspecified · Soft through medium–hard
Printed clock: VARIOUS AIMING POSITION
Printed hardness: SOFT, OR SOFT TO MEDIUM SHOT, MEDIUM, OR MEDIUM TO HARD SHOT · Application source
Classification confidence: high
Primary: Purpose awaiting review
Secondary: None
King-club arrangement compares spin-shaped returns to the corner target.
Implementation is documented, but a separate training purpose has not yet been assigned. Author review needed; no escape/defense purpose inferred.
Shot implementation: Kick Shots · Sidespin / English · Various · unspecified · Soft through medium–hard
Printed clock: VARIOUS AIMING POSITION
Printed hardness: SOFT, OR SOFT TO MEDIUM SHOT, MEDIUM, OR MEDIUM TO HARD SHOT · Application source
Classification confidence: high
Primary: Purpose awaiting review
Secondary: None
King-diamond arrangement demonstrates alternate contacts for the corner-target kick.
Implementation is documented, but a separate training purpose has not yet been assigned. Author review needed; no escape/defense purpose inferred.
Shot implementation: Kick Shots · Sidespin / English · Various · unspecified · Soft through medium–hard
Printed clock: VARIOUS AIMING POSITION
Printed hardness: SOFT, OR SOFT TO MEDIUM SHOT, MEDIUM, OR MEDIUM TO HARD SHOT · Application source
Classification confidence: high
Primary: Purpose awaiting review
Secondary: None
King-heart arrangement includes two-cushion alternatives alongside spin-dependent corner arrivals.
Implementation is documented, but a separate training purpose has not yet been assigned. Author review needed; no escape/defense purpose inferred.
Shot implementation: Kick Shots · Sidespin / English · Multi-Rail Routes · Various · unspecified · Soft through medium–hard
Printed clock: VARIOUS AIMING POSITION
Printed hardness: SOFT, OR SOFT TO MEDIUM SHOT, MEDIUM, OR MEDIUM TO HARD SHOT · Application source
Classification confidence: high
Primary: Purpose awaiting review
Secondary: None
Two-cushion corner-target alternatives compare the indicated cue contacts.
Implementation is documented, but a separate training purpose has not yet been assigned. Author review needed; no escape/defense purpose inferred.
Shot implementation: Kick Shots · Multi-Rail Routes · Sidespin / English · Various · unspecified · Soft through medium–hard
Printed clock: VARIOUS AIMING POSITION
Printed hardness: SOFT, OR SOFT TO MEDIUM SHOT, MEDIUM, OR MEDIUM TO HARD SHOT · Application source
Classification confidence: high
Primary: Purpose awaiting review
Secondary: None
Alternate starting arrangement uses two cushions and compares spin-dependent arrivals.
Implementation is documented, but a separate training purpose has not yet been assigned. Author review needed; no escape/defense purpose inferred.
Shot implementation: Kick Shots · Multi-Rail Routes · Sidespin / English · Various · unspecified · Soft through medium–hard
Printed clock: VARIOUS AIMING POSITION
Printed hardness: SOFT, OR SOFT TO MEDIUM SHOT, MEDIUM, OR MEDIUM TO HARD SHOT · Application source
Classification confidence: high
Primary: Purpose awaiting review
Secondary: None
Three-cushion corner-target routes compare the spin settings associated with each line.
Implementation is documented, but a separate training purpose has not yet been assigned. Author review needed; no escape/defense purpose inferred.
Shot implementation: Kick Shots · Multi-Rail Routes · Sidespin / English · Various · unspecified · Medium / medium–hard
Printed clock: VARIOUS AIMING POSITION
Printed hardness: MEDIUM, OR MEDIUM TO HARD SHOT · Application source
Classification confidence: high
Primary: Purpose awaiting review
Secondary: None
The final corner-target arrangement extends the spin comparison through three cushions.
Implementation is documented, but a separate training purpose has not yet been assigned. Author review needed; no escape/defense purpose inferred.
Shot implementation: Kick Shots · Multi-Rail Routes · Sidespin / English · Various · unspecified · Medium / medium–hard
Printed clock: VARIOUS AIMING POSITION
Printed hardness: MEDIUM, OR MEDIUM TO HARD SHOT · Application source
Classification confidence: high
Primary: Aiming Systems
Secondary: Pocketing
Ghost-ball construction aligns the required cue-ball center behind the object ball for a direct pot.
Shot implementation: Stun / Follow / Draw · Center ball · Soft / soft–medium
Printed clock: CENTER BALL STUN SHOT
Printed hardness: SOFT, OR SOFT TO MEDIUM SHOT · Application source
Classification confidence: high
Primary: Aiming Systems
Secondary: Pocketing
Contact-point-to-contact-point construction aligns a direct pocketing shot.
Shot implementation: Stun / Follow / Draw · Center ball · Soft / soft–medium
Printed clock: CENTER BALL STUN SHOT
Printed hardness: SOFT, OR SOFT TO MEDIUM SHOT · Application source
Classification confidence: high
Primary: Aiming Systems
Secondary: Pocketing
Fractional overlaps supply repeatable contact references for direct cuts.
Shot implementation: Stun / Follow / Draw · Center ball · Soft / soft–medium
Printed clock: CENTER BALL STUN SHOT
Printed hardness: SOFT, OR SOFT TO MEDIUM SHOT · Application source
Classification confidence: high
Primary: Aiming Systems
Secondary: Pocketing
Fractional overlaps are related to different cut angles and pocketing lines.
Shot implementation: Stun / Follow / Draw · Center ball · Soft / soft–medium
Printed clock: CENTER BALL STUN SHOT
Printed hardness: SOFT, OR SOFT TO MEDIUM SHOT · Application source
Classification confidence: high
Primary: Cue-Ball Control
Secondary: None
The 90-degree tangent reference explicitly teaches the post-contact cue-ball path in a stun state.
Shot implementation: Stun / Follow / Draw · Center ball · Soft / soft–medium
Printed clock: CENTER BALL STUN SHOT
Printed hardness: SOFT, OR SOFT TO MEDIUM SHOT · Application source
Classification confidence: high
Primary: Cue-Ball Control
Secondary: None
Use the stun tangent line to recognize a cue-ball scratch route after object-ball contact.
Shot implementation: Stun / Follow / Draw · Center ball · Soft / soft–medium
Printed clock: CENTER BALL STUN SHOT
Printed hardness: SOFT, OR SOFT TO MEDIUM SHOT · Application source
Classification confidence: high
Primary: Cue-Ball Control
Secondary: None
The natural rolling 30-degree reference predicts the post-contact cue-ball path.
Shot implementation: Stun / Follow / Draw · Clock data needs review · Soft / soft–medium
Printed clock: SOFT, OR SOFT TO MEDIUM SHOT, 12 O'CLOCK FOLLOW SHOT
Printed hardness: SOFT, OR SOFT TO MEDIUM SHOT · Application source
Malformed cue-contact metadata; exact clock parsing withheld. Read the original diagram/author revision.
Classification confidence: high
Primary: Cue-Ball Control
Secondary: None
The rolling-ball thirds rule compares thin, half-ball and thick-hit departure angles.
Shot implementation: Stun / Follow / Draw · 12:00 · top · Soft / soft–medium
Printed clock: 12 O'CLOCK FOLLOW SHOT
Printed hardness: SOFT, OR SOFT TO MEDIUM SHOT · Application source
Classification confidence: high
Primary: Cue-Ball Control
Secondary: None
Stun tangent-line examples extend the cue-ball path through multiple cushions from the spade layout.
Shot implementation: Stun / Follow / Draw · Multi-Rail Routes · Center ball · Medium / medium–hard
Printed clock: CENTER BALL STUN SHOT
Printed hardness: MEDIUM, OR MEDIUM TO HARD SHOT · Application source
Classification confidence: high
Primary: Cue-Ball Control
Secondary: None
Club-layout alternatives carry the stun departure line through successive cushion contacts.
Shot implementation: Stun / Follow / Draw · Multi-Rail Routes · Center ball · Medium / medium–hard
Printed clock: CENTER BALL STUN SHOT
Printed hardness: MEDIUM, OR MEDIUM TO HARD SHOT · Application source
Classification confidence: high
Primary: Cue-Ball Control
Secondary: None
Diamond-layout alternatives compare multi-cushion continuations from the stun tangent line.
Shot implementation: Stun / Follow / Draw · Multi-Rail Routes · Center ball · Medium / medium–hard
Printed clock: CENTER BALL STUN SHOT
Printed hardness: MEDIUM, OR MEDIUM TO HARD SHOT · Application source
Classification confidence: high
Primary: Cue-Ball Control
Secondary: None
Heart-layout alternatives use the stun departure to anticipate the longer cue-ball route.
Shot implementation: Stun / Follow / Draw · Multi-Rail Routes · Center ball · Medium / medium–hard
Printed clock: CENTER BALL STUN SHOT
Printed hardness: MEDIUM, OR MEDIUM TO HARD SHOT · Application source
Classification confidence: high
Primary: Cue-Ball Control
Secondary: None
Compare the tangent reference with the cue-ball path altered by upper-right spin.
Shot implementation: Stun / Follow / Draw · Sidespin / English · 1:30 · upper right · Soft through medium–hard
Printed clock: 1:30 O'CLOCK SLIGHT TOP RIGHT
Printed hardness: SOFT, OR SOFT TO MEDIUM SHOT, MEDIUM, OR MEDIUM TO HARD SHOT · Application source
Classification confidence: high
Primary: Cue-Ball Control
Secondary: None
Compare the tangent reference with the cue-ball path altered by upper-left spin.
Shot implementation: Stun / Follow / Draw · Sidespin / English · 10:30 · upper left · Soft through medium–hard
Printed clock: 10:30 O'CLOCK SLIGHT TOP LEFT
Printed hardness: SOFT, OR SOFT TO MEDIUM SHOT, MEDIUM, OR MEDIUM TO HARD SHOT · Application source
Classification confidence: high
Primary: Position Play
Secondary: Cue-Ball Control
Follow and right sidespin deliver the cue ball toward the explicitly marked next-ball target B.
Shot implementation: Stun / Follow / Draw · Sidespin / English · 1:30 · upper right · Medium / medium–hard
Printed clock: 1:30 O'CLOCK SLIGHT TOP RIGHT
Printed hardness: MEDIUM, OR MEDIUM TO HARD SHOT · Application source
Classification confidence: high
Primary: Position Play
Secondary: Cue-Ball Control
Follow and left sidespin deliver the cue ball toward the opposite next-ball target B.
Shot implementation: Stun / Follow / Draw · Sidespin / English · 10:30 · upper left · Medium / medium–hard
Printed clock: 10:30 O'CLOCK SLIGHT TOP LEFT
Printed hardness: MEDIUM, OR MEDIUM TO HARD SHOT · Application source
Classification confidence: high
Primary: Position Play
Secondary: Pocketing
Cheat the pocket's acceptance window and vary spin to change the leave relative to the next target.
Shot implementation: Sidespin / English · Stun / Follow / Draw · Center ball · 4:30 · lower right · Medium / medium–hard
Printed clock: CENTER BALL STUN SHOT, 4:30 O'CLOCK SLIGHT BOTTOM RIGHT
Printed hardness: MEDIUM, OR MEDIUM TO HARD SHOT · Application source
Classification confidence: high
Primary: Position Play
Secondary: Pocketing
Pocket-entry and bottom-right contact alternatives produce a longer position route toward the next target.
Shot implementation: Sidespin / English · Stun / Follow / Draw · Multi-Rail Routes · Center ball · 4:30 · lower right · Medium / medium–hard
Printed clock: CENTER BALL STUN SHOT, 4:30 O'CLOCK SLIGHT BOTTOM RIGHT
Printed hardness: MEDIUM, OR MEDIUM TO HARD SHOT · Application source
Classification confidence: high
Primary: Position Play
Secondary: Pocketing
Pocket-entry and upper-right contact alternatives produce a multi-cushion leave for the next target.
Shot implementation: Sidespin / English · Stun / Follow / Draw · Multi-Rail Routes · Center ball · 1:30 · upper right · Soft / soft–medium
Printed clock: CENTER BALL STUN SHOT, 1:30 O'CLOCK SLIGHT TOP RIGHT
Printed hardness: SOFT, OR SOFT TO MEDIUM SHOT · Application source
Classification confidence: high
Primary: Position Play
Secondary: Pocketing
Pocket-entry and lower-left contact alternatives change the multi-cushion position route.
Shot implementation: Sidespin / English · Stun / Follow / Draw · Multi-Rail Routes · Center ball · 7:30 · lower left · Soft / soft–medium
Printed clock: CENTER BALL STUN SHOT, 7:30 O'CLOCK SLIGHT BOTTOM LEFT
Printed hardness: SOFT, OR SOFT TO MEDIUM SHOT · Application source
Classification confidence: high
Primary: Cue-Ball Control
Secondary: None
Soft near-rail object-ball contact examples compare outgoing cue-ball angles and spin; the kick title does not establish rail-first contact.
Shot implementation: Stun / Follow / Draw · Sidespin / English · Various · unspecified · Soft / soft–medium
Printed clock: VARIOUS AIMING POSITION
Printed hardness: SOFT, OR SOFT TO MEDIUM SHOT · Application source
Kick title does not establish rail-first contact; illustrated cue-ball continuation supports control/spin. Confirm contact order before adding kick. 8C/8D/8H also contain malformed clock-position metadata.
Classification confidence: medium · Author review required
Kick title does not establish rail-first contact; illustrated cue-ball continuation supports control/spin. Confirm contact order before adding kick. 8C/8D/8H also contain malformed clock-position metadata. Withheld: Kick Shots.
Primary: Cue-Ball Control
Secondary: None
Firmer near-rail contact examples compare post-collision paths; contact order needs reconciliation with the kick title.
Shot implementation: Stun / Follow / Draw · Sidespin / English · Various · unspecified · Medium / medium–hard
Printed clock: VARIOUS AIMING POSITION
Printed hardness: MEDIUM, OR MEDIUM TO HARD SHOT · Application source
Kick title does not establish rail-first contact; illustrated cue-ball continuation supports control/spin. Confirm contact order before adding kick. 8C/8D/8H also contain malformed clock-position metadata.
Classification confidence: medium · Author review required
Kick title does not establish rail-first contact; illustrated cue-ball continuation supports control/spin. Confirm contact order before adding kick. 8C/8D/8H also contain malformed clock-position metadata. Withheld: Kick Shots.
Primary: Cue-Ball Control
Secondary: None
Soft near-rail layout compares alternate outgoing cue-ball lines and scratch exposure.
Shot implementation: Stun / Follow / Draw · Sidespin / English · Various · unspecified · Soft / soft–medium
Printed clock: VARIOUS AIMING POSITION
Printed hardness: SOFT, OR SOFT TO MEDIUM SHOT · Application source
Kick title does not establish rail-first contact; illustrated cue-ball continuation supports control/spin. Confirm contact order before adding kick. 8C/8D/8H also contain malformed clock-position metadata.
Classification confidence: medium · Author review required
Kick title does not establish rail-first contact; illustrated cue-ball continuation supports control/spin. Confirm contact order before adding kick. 8C/8D/8H also contain malformed clock-position metadata. Withheld: Kick Shots.
Primary: Cue-Ball Control
Secondary: None
Firm near-rail layout compares alternate outgoing paths and cue-contact effects.
Shot implementation: Stun / Follow / Draw · Sidespin / English · Various · unspecified · Medium / medium–hard
Printed clock: VARIOUS AIMING POSITION
Printed hardness: MEDIUM, OR MEDIUM TO HARD SHOT · Application source
Kick title does not establish rail-first contact; illustrated cue-ball continuation supports control/spin. Confirm contact order before adding kick. 8C/8D/8H also contain malformed clock-position metadata.
Classification confidence: medium · Author review required
Kick title does not establish rail-first contact; illustrated cue-ball continuation supports control/spin. Confirm contact order before adding kick. 8C/8D/8H also contain malformed clock-position metadata. Withheld: Kick Shots.
Primary: Cue-Ball Control
Secondary: None
Near-rail object-ball contact compares follow and draw cue-ball continuations.
Shot implementation: Stun / Follow / Draw · 12:00 · top · 6:00 · bottom · Soft / soft–medium
Printed clock: 12 O'CLOCK FOLLOW SHOT, 6 O'CLOCK BACKSPIN/DRAW SHOT
Printed hardness: SOFT, OR SOFT TO MEDIUM SHOT · Application source
Kick title does not establish rail-first contact; illustrated cue-ball continuation supports control/spin. Confirm contact order before adding kick. 8C/8D/8H also contain malformed clock-position metadata.
Classification confidence: medium · Author review required
Kick title does not establish rail-first contact; illustrated cue-ball continuation supports control/spin. Confirm contact order before adding kick. 8C/8D/8H also contain malformed clock-position metadata. Withheld: Kick Shots.
Primary: Cue-Ball Control
Secondary: None
Follow/draw alternatives include a longer cushion continuation; the 13-o'clock metadata is malformed.
Shot implementation: Stun / Follow / Draw · Multi-Rail Routes · Clock data needs review · Medium / medium–hard
Printed clock: 13 O'CLOCK FOLLOW SHOT, 6 O'CLOCK BACKSPIN/DRAW SHOT
Printed hardness: MEDIUM, OR MEDIUM TO HARD SHOT · Application source
Malformed cue-contact metadata; exact clock parsing withheld. Read the original diagram/author revision.
Kick title does not establish rail-first contact; illustrated cue-ball continuation supports control/spin. Confirm contact order before adding kick. 8C/8D/8H also contain malformed clock-position metadata.
Classification confidence: medium · Author review required
Kick title does not establish rail-first contact; illustrated cue-ball continuation supports control/spin. Confirm contact order before adding kick. 8C/8D/8H also contain malformed clock-position metadata. Withheld: Kick Shots.
Primary: Cue-Ball Control
Secondary: None
Follow/draw route comparison is visible despite the malformed 14-o'clock metadata.
Shot implementation: Stun / Follow / Draw · Clock data needs review · Soft / soft–medium
Printed clock: 14 O'CLOCK FOLLOW SHOT, 6 O'CLOCK BACKSPIN/DRAW SHOT
Printed hardness: SOFT, OR SOFT TO MEDIUM SHOT · Application source
Malformed cue-contact metadata; exact clock parsing withheld. Read the original diagram/author revision.
Kick title does not establish rail-first contact; illustrated cue-ball continuation supports control/spin. Confirm contact order before adding kick. 8C/8D/8H also contain malformed clock-position metadata.
Classification confidence: medium · Author review required
Kick title does not establish rail-first contact; illustrated cue-ball continuation supports control/spin. Confirm contact order before adding kick. 8C/8D/8H also contain malformed clock-position metadata. Withheld: Kick Shots.
Primary: Cue-Ball Control
Secondary: None
Follow/draw alternatives include multiple cushions; the 15-o'clock metadata needs correction.
Shot implementation: Stun / Follow / Draw · Multi-Rail Routes · Clock data needs review · Medium / medium–hard
Printed clock: 15 O'CLOCK FOLLOW SHOT, 6 O'CLOCK BACKSPIN/DRAW SHOT
Printed hardness: MEDIUM, OR MEDIUM TO HARD SHOT · Application source
Malformed cue-contact metadata; exact clock parsing withheld. Read the original diagram/author revision.
Kick title does not establish rail-first contact; illustrated cue-ball continuation supports control/spin. Confirm contact order before adding kick. 8C/8D/8H also contain malformed clock-position metadata.
Classification confidence: medium · Author review required
Kick title does not establish rail-first contact; illustrated cue-ball continuation supports control/spin. Confirm contact order before adding kick. 8C/8D/8H also contain malformed clock-position metadata. Withheld: Kick Shots.
Primary: Cue-Ball Control
Secondary: Speed Control
Compare spin-shaped cushion returns and the annotated loss of travel/speed.
Shot implementation: Sidespin / English · 1:30 · upper right · 7:30 · lower left · Medium / medium–hard
Printed clock: 1:30 O'CLOCK SLIGHT TOP RIGHT, 7:30 O'CLOCK SLIGHT BOTTOM LEFT
Printed hardness: MEDIUM, OR MEDIUM TO HARD SHOT · Application source
Kick title does not establish rail-first contact; illustrated cue-ball continuation supports control/spin. Confirm contact order before adding kick. 8C/8D/8H also contain malformed clock-position metadata.
Classification confidence: medium · Author review required
Kick title does not establish rail-first contact; illustrated cue-ball continuation supports control/spin. Confirm contact order before adding kick. 8C/8D/8H also contain malformed clock-position metadata. Withheld: Kick Shots.
Primary: Cue-Ball Control
Secondary: None
Compare the wider cue-ball rebound created by alternate side/vertical contact combinations.
Shot implementation: Sidespin / English · 10:30 · upper left · 7:30 · lower left · Medium / medium–hard
Printed clock: 10:30 O'CLOCK SLIGHT TOP LEFT, 7:30 O'CLOCK SLIGHT BOTTOM LEFT
Printed hardness: MEDIUM, OR MEDIUM TO HARD SHOT · Application source
Kick title does not establish rail-first contact; illustrated cue-ball continuation supports control/spin. Confirm contact order before adding kick. 8C/8D/8H also contain malformed clock-position metadata.
Classification confidence: medium · Author review required
Kick title does not establish rail-first contact; illustrated cue-ball continuation supports control/spin. Confirm contact order before adding kick. 8C/8D/8H also contain malformed clock-position metadata. Withheld: Kick Shots.
Primary: Cue-Ball Control
Secondary: None
Opposite-side contacts change the cushion return angle in the diamond layout.
Shot implementation: Sidespin / English · 1:30 · upper right · 7:30 · lower left · Medium / medium–hard
Printed clock: 1:30 O'CLOCK SLIGHT TOP RIGHT, 7:30 O'CLOCK SLIGHT BOTTOM LEFT
Printed hardness: MEDIUM, OR MEDIUM TO HARD SHOT · Application source
Kick title does not establish rail-first contact; illustrated cue-ball continuation supports control/spin. Confirm contact order before adding kick. 8C/8D/8H also contain malformed clock-position metadata.
Classification confidence: medium · Author review required
Kick title does not establish rail-first contact; illustrated cue-ball continuation supports control/spin. Confirm contact order before adding kick. 8C/8D/8H also contain malformed clock-position metadata. Withheld: Kick Shots.
Primary: Cue-Ball Control
Secondary: Speed Control
Compare the spin-dependent rebound and annotated reduction in travel.
Shot implementation: Sidespin / English · 10:30 · upper left · 7:30 · lower left · Medium / medium–hard
Printed clock: 10:30 O'CLOCK SLIGHT TOP LEFT, 7:30 O'CLOCK SLIGHT BOTTOM LEFT
Printed hardness: MEDIUM, OR MEDIUM TO HARD SHOT · Application source
Kick title does not establish rail-first contact; illustrated cue-ball continuation supports control/spin. Confirm contact order before adding kick. 8C/8D/8H also contain malformed clock-position metadata.
Classification confidence: medium · Author review required
Kick title does not establish rail-first contact; illustrated cue-ball continuation supports control/spin. Confirm contact order before adding kick. 8C/8D/8H also contain malformed clock-position metadata. Withheld: Kick Shots.
Primary: Carom / Billiard Shots
Secondary: Cue-Ball Control
Draw after contacting the first object ball redirects the cue ball toward the 9-ball target.
Shot implementation: Stun / Follow / Draw · 6:00 · bottom · Medium / medium–hard
Printed clock: 6 O'CLOCK BACKSPIN/DRAW SHOT
Printed hardness: MEDIUM, OR MEDIUM TO HARD SHOT · Application source
Classification confidence: high
Primary: Carom / Billiard Shots
Secondary: None
Frozen-pair layout and draw are visible; carom versus combination depends on which ball continues to the final target and needs confirmation.
Shot implementation: Stun / Follow / Draw · 6:00 · bottom · Soft / soft–medium
Printed clock: 6 O'CLOCK BACKSPIN/DRAW SHOT
Printed hardness: SOFT, OR SOFT TO MEDIUM SHOT · Application source
Classification confidence: low · Author review required
Confirm which ball continues after the frozen/multi-ball collision. Carom is a provisional principal family, not an approved resolution of the combination/kick wording. Withheld: Combination Shots, Kick Shots.
Primary: Carom / Billiard Shots
Secondary: None
Frozen-ball arrangement compares stun/draw; the ball-to-ball contact sequence needs author confirmation before adding combination or kick tags.
Shot implementation: Stun / Follow / Draw · Center ball · 6:00 · bottom · Soft / soft–medium
Printed clock: CENTER BALL STUN SHOT, 6 O'CLOCK BACKSPIN/DRAW SHOT
Printed hardness: SOFT, OR SOFT TO MEDIUM SHOT · Application source
Classification confidence: low · Author review required
Confirm which ball continues after the frozen/multi-ball collision. Carom is a provisional principal family, not an approved resolution of the combination/kick wording. Withheld: Combination Shots, Kick Shots.
Primary: Carom / Billiard Shots
Secondary: Cue-Ball Control
The multi-ball arrangement redirects a continuation toward a target; the combination title and malformed contact metadata leave the precise sequence unresolved.
Shot implementation: Clock data needs review · Soft / soft–medium
Printed clock: CENTER BALL STUN SHOT, 6 O'CLO12 O'CLOCK FOLLOW SHOT, 10:30 O'CLOCK SLIGHT TOP LEFT, 12 O'CLOCK FOLLOW SHOT
Printed hardness: SOFT, OR SOFT TO MEDIUM SHOT · Application source
Malformed cue-contact metadata; exact clock parsing withheld. Read the original diagram/author revision.
Classification confidence: low · Author review required
Confirm which ball continues after the frozen/multi-ball collision. Carom is a provisional principal family, not an approved resolution of the combination/kick wording. Withheld: Combination Shots, Kick Shots.
Primary: Position Play
Secondary: Cue-Ball Control
Corner hanger offers alternative follow-shaped cue-ball exits for choosing the next leave.
Shot implementation: Stun / Follow / Draw · Sidespin / English · 12:00 · top · 10:30 · upper left · Soft / soft–medium
Printed clock: 12 O'CLOCK FOLLOW SHOT, 10:30 O'CLOCK SLIGHT TOP LEFT, 12 O'CLOCK FOLLOW SHOT
Printed hardness: SOFT, OR SOFT TO MEDIUM SHOT · Application source
Classification confidence: high
Primary: Position Play
Secondary: Cue-Ball Control
Corner hanger route fan uses upper-left sidespin to choose the cue-ball exit.
Shot implementation: Sidespin / English · 10:30 · upper left · Soft through medium–hard
Printed clock: 10:30 O'CLOCK SLIGHT TOP LEFT
Printed hardness: SOFT, OR SOFT TO MEDIUM SHOT, MEDIUM, OR MEDIUM TO HARD SHOT · Application source
Classification confidence: high
Primary: Position Play
Secondary: Cue-Ball Control
Alternate corner-hanger approach uses the illustrated upper-left contact to change the leave.
Shot implementation: Sidespin / English · 10:30 · upper left · Medium / medium–hard
Printed clock: 10:30 O'CLOCK SLIGHT TOP LEFT
Printed hardness: MEDIUM, OR MEDIUM TO HARD SHOT · Application source
Classification confidence: high
Primary: Position Play
Secondary: None
Rail-first corner-hanger approach pockets the hanger while shaping the cue-ball exit.
Shot implementation: Kick Shots · Sidespin / English · 10:30 · upper left · Medium / medium–hard
Printed clock: 10:30 O'CLOCK SLIGHT TOP LEFT
Printed hardness: MEDIUM, OR MEDIUM TO HARD SHOT · Application source
Classification confidence: high
Primary: Position Play
Secondary: Cue-Ball Control
Side hanger uses bottom-right contact to change the post-pocketing position route.
Shot implementation: Stun / Follow / Draw · Sidespin / English · 4:30 · lower right · Soft through medium–hard
Printed clock: 4:30 O'CLOCK SLIGHT BOTTOM RIGHT
Printed hardness: SOFT, OR SOFT TO MEDIUM SHOT, MEDIUM, OR MEDIUM TO HARD SHOT · Application source
Classification confidence: high
Primary: Position Play
Secondary: Cue-Ball Control
Side hanger uses upper-right spin and successive cushions to develop position routes.
Shot implementation: Sidespin / English · Multi-Rail Routes · 1:30 · upper right · Soft through medium–hard
Printed clock: 1:30 O'CLOCK SLIGHT TOP RIGHT
Printed hardness: SOFT, OR SOFT TO MEDIUM SHOT, MEDIUM, OR MEDIUM TO HARD SHOT · Application source
Classification confidence: high
Primary: Position Play
Secondary: Cue-Ball Control
Alternate side-hanger approach uses upper-left spin to choose a longer position route.
Shot implementation: Sidespin / English · Multi-Rail Routes · 10:30 · upper left · Soft through medium–hard
Printed clock: 10:30 O'CLOCK SLIGHT TOP LEFT
Printed hardness: SOFT, OR SOFT TO MEDIUM SHOT, MEDIUM, OR MEDIUM TO HARD SHOT · Application source
Classification confidence: high
Primary: Position Play
Secondary: Cue-Ball Control
Center-ball side-hanger arrangement develops alternative cushion continuations for the leave.
Shot implementation: Multi-Rail Routes · Stun / Follow / Draw · Center ball · Soft through medium–hard
Printed clock: CENTER BALL STUN SHOT
Printed hardness: SOFT, OR SOFT TO MEDIUM SHOT, MEDIUM, OR MEDIUM TO HARD SHOT · Application source
Classification confidence: high
Primary: Carom / Billiard Shots
Secondary: Bank Shots
Cross-bank multi-ball arrangement shows alternative scoring paths; carom as the principal family is provisional pending ball-path confirmation.
Shot implementation: Stun / Follow / Draw · Center ball · Soft / soft–medium
Printed clock: CENTER BALL STUN SHOT
Printed hardness: SOFT, OR SOFT TO MEDIUM SHOT · Application source
Classification confidence: low · Author review required
Confirm the ball-path identities and dominant carom/bank objective. Both are provisional associations; multiple scoring chances do not establish a two-way safety. Withheld: Two-Way Shots, Defensive / Safety Play.
Primary: Carom / Billiard Shots
Secondary: Bank Shots
Double-chance arrangement combines a second-target route with an object-ball cushion route; no guaranteed two-way safety is inferred.
Shot implementation: Stun / Follow / Draw · Center ball · Soft / soft–medium
Printed clock: CENTER BALL STUN SHOT
Printed hardness: SOFT, OR SOFT TO MEDIUM SHOT · Application source
Classification confidence: low · Author review required
Confirm the ball-path identities and dominant carom/bank objective. Both are provisional associations; multiple scoring chances do not establish a two-way safety. Withheld: Two-Way Shots, Defensive / Safety Play.
Primary: Carom / Billiard Shots
Secondary: Bank Shots
Double-chance arrangement adds a draw alternative; confirm which scoring route is the principal training objective.
Shot implementation: Stun / Follow / Draw · Center ball · 6:00 · bottom · Soft / soft–medium
Printed clock: CENTER BALL STUN SHOT, 6 O'CLOCK BACKSPIN/DRAW SHOT
Printed hardness: SOFT, OR SOFT TO MEDIUM SHOT · Application source
Classification confidence: low · Author review required
Confirm the ball-path identities and dominant carom/bank objective. Both are provisional associations; multiple scoring chances do not establish a two-way safety. Withheld: Two-Way Shots, Defensive / Safety Play.
Primary: Carom / Billiard Shots
Secondary: Bank Shots
Multi-ball cross-bank layout shows a cushion route toward the target; contact order and dominant family require author confirmation.
Shot implementation: Stun / Follow / Draw · Center ball · 6:00 · bottom · Medium / medium–hard
Printed clock: CENTER BALL STUN SHOT, 6 O'CLOCK BACKSPIN/DRAW SHOT
Printed hardness: MEDIUM, OR MEDIUM TO HARD SHOT · Application source
Classification confidence: low · Author review required
Confirm the ball-path identities and dominant carom/bank objective. Both are provisional associations; multiple scoring chances do not establish a two-way safety. Withheld: Two-Way Shots, Defensive / Safety Play.
Primary: Purpose awaiting review
Secondary: None
Cue ball reaches the side-pocket target after one cushion; the diagram is more specific than the general Shotmaking label.
Implementation is documented, but a separate training purpose has not yet been assigned. Author review needed; no escape/defense purpose inferred.
Shot implementation: Kick Shots · Stun / Follow / Draw · Center ball · Soft / soft–medium
Printed clock: CENTER BALL STUN SHOT
Printed hardness: SOFT, OR SOFT TO MEDIUM SHOT · Application source
Classification confidence: high
Primary: Purpose awaiting review
Secondary: None
Side-pocket target is reached through one- and two-cushion cue-ball alternatives with center/follow contacts.
Implementation is documented, but a separate training purpose has not yet been assigned. Author review needed; no escape/defense purpose inferred.
Shot implementation: Kick Shots · Multi-Rail Routes · Stun / Follow / Draw · Center ball · 12:00 · top · Medium / medium–hard
Printed clock: CENTER BALL STUN SHOT, 12 O'CLOCK FOLLOW SHOT
Printed hardness: MEDIUM, OR MEDIUM TO HARD SHOT · Application source
Classification confidence: high
Primary: Purpose awaiting review
Secondary: None
Two-cushion side-pocket route compares upper-right and pure-right sidespin.
Implementation is documented, but a separate training purpose has not yet been assigned. Author review needed; no escape/defense purpose inferred.
Shot implementation: Kick Shots · Multi-Rail Routes · Sidespin / English · 1:30 · upper right · 3:00 · right · Medium / medium–hard
Printed clock: 1:30 O'CLOCK SLIGHT TOP RIGHT, 3 O'CLOCK RIGHT SIDE SPIN
Printed hardness: MEDIUM, OR MEDIUM TO HARD SHOT · Application source
Classification confidence: high
Primary: Bank Shots
Secondary: None
The dark object ball follows the cushion route toward the side pocket; bank is recommended over the generic Shotmaking label, pending contact-order confirmation.
Shot implementation: Stun / Follow / Draw · Center ball · Soft / soft–medium
Printed clock: CENTER BALL STUN SHOT
Printed hardness: SOFT, OR SOFT TO MEDIUM SHOT · Application source
Diagram suggests an object-ball bank rather than a cue-ball kick. Confirm ball identity and contact sequence.
Classification confidence: medium · Author review required
Diagram suggests an object-ball bank rather than a cue-ball kick. Confirm ball identity and contact sequence. Withheld: Kick Shots.
Primary: Defensive / Safety Play
Secondary: Speed Control
Send the object ball around cushions into the shaded defensive end zone while separating the cue ball.
Shot implementation: Multi-Rail Routes · Center ball · Medium-hard
Printed clock: CENTER BALL
Printed hardness: MEDIUM-HARD SHOT · Application source
Classification confidence: high
Primary: Defensive / Safety Play
Secondary: Speed Control
Club starting angle routes the object ball around cushions into the distant defensive zone.
Shot implementation: Multi-Rail Routes · Center ball · Medium-hard
Printed clock: CENTER BALL
Printed hardness: MEDIUM-HARD SHOT · Application source
Classification confidence: high
Primary: Defensive / Safety Play
Secondary: Speed Control
Diamond starting layout requires controlling a multi-cushion object-ball arrival inside the shaded safety zone.
Shot implementation: Multi-Rail Routes · Center ball · Medium-hard
Printed clock: CENTER BALL
Printed hardness: MEDIUM-HARD SHOT · Application source
Classification confidence: high
Primary: Defensive / Safety Play
Secondary: Speed Control
Heart layout sends the object ball to the opposite upper safety zone; distance control determines the leave.
Shot implementation: Multi-Rail Routes · Center ball · Medium-soft
Printed clock: CENTER BALL
Printed hardness: MEDIUM-SOFT SHOT · Application source
Classification confidence: high
Primary: Defensive / Safety Play
Secondary: Speed Control
The spade approach changes the multi-cushion object-ball line into the marked defensive destination.
Shot implementation: Multi-Rail Routes · Center ball · Medium-hard
Printed clock: CENTER BALL
Printed hardness: MEDIUM-HARD SHOT · Application source
Classification confidence: high
Primary: Defensive / Safety Play
Secondary: Speed Control
Club approach controls the object-ball travel through successive cushions to the marked end zone.
Shot implementation: Multi-Rail Routes · Center ball · Medium-hard
Printed clock: CENTER BALL
Printed hardness: MEDIUM-HARD SHOT · Application source
Classification confidence: high
Primary: Defensive / Safety Play
Secondary: Speed Control
Diamond approach uses the longer object-ball route to create separation at the marked destination.
Shot implementation: Multi-Rail Routes · Center ball · Medium-hard
Printed clock: CENTER BALL
Printed hardness: MEDIUM-HARD SHOT · Application source
Classification confidence: high
Primary: Defensive / Safety Play
Secondary: Speed Control
Heart approach requires the object ball to finish in the safety zone after its multi-cushion travel.
Shot implementation: Multi-Rail Routes · Center ball · Medium-hard
Printed clock: CENTER BALL
Printed hardness: MEDIUM-HARD SHOT · Application source
Classification confidence: high
Primary: Defensive / Safety Play
Secondary: Speed Control
Two-cushion object-ball safety returns toward the upper shaded zone with controlled travel.
Shot implementation: Multi-Rail Routes · Center ball · Medium-soft
Printed clock: CENTER BALL
Printed hardness: MEDIUM-SOFT SHOT · Application source
Classification confidence: high
Primary: Defensive / Safety Play
Secondary: Speed Control
Alternate two-cushion approach returns the object ball to the upper defensive zone.
Shot implementation: Multi-Rail Routes · Center ball · Medium-soft
Printed clock: CENTER BALL
Printed hardness: MEDIUM-SOFT SHOT · Application source
Classification confidence: high
Primary: Defensive / Safety Play
Secondary: Rail / Diamond Systems · Speed Control
Half-distance split and parallel shift construct the object-ball route into the safety end zone.
Shot implementation: Multi-Rail Routes · Center ball · Medium-soft
Printed clock: CENTER BALL
Printed hardness: MEDIUM-SOFT SHOT · Application source
Classification confidence: high
Primary: Defensive / Safety Play
Secondary: Rail / Diamond Systems · Speed Control
Alternate half-distance/parallel construction locates the rebound route and controlled defensive arrival.
Shot implementation: Multi-Rail Routes · Center ball · Medium-soft
Printed clock: CENTER BALL
Printed hardness: MEDIUM-SOFT SHOT · Application source
Classification confidence: high
Primary: Defensive / Safety Play
Secondary: Rail / Diamond Systems · Speed Control
Midpoint and parallel-shift construction sends the object ball through cushions toward a defensive destination.
Shot implementation: Multi-Rail Routes · Center ball · Medium-soft
Printed clock: CENTER BALL
Printed hardness: MEDIUM-SOFT SHOT · Application source
Classification confidence: high
Primary: Defensive / Safety Play
Secondary: Rail / Diamond Systems · Speed Control
Club layout transfers the midpoint/parallel construction to a different starting approach and safety zone.
Shot implementation: Multi-Rail Routes · Center ball · Medium-soft
Printed clock: CENTER BALL
Printed hardness: MEDIUM-SOFT SHOT · Application source
Classification confidence: high
Primary: Defensive / Safety Play
Secondary: Rail / Diamond Systems · Speed Control
Diamond layout uses the plotted parallel reference to control a multi-cushion object-ball safety.
Shot implementation: Multi-Rail Routes · Center ball · Medium-soft
Printed clock: CENTER BALL
Printed hardness: MEDIUM-SOFT SHOT · Application source
Classification confidence: high
Primary: Defensive / Safety Play
Secondary: Rail / Diamond Systems · Speed Control
Heart layout connects the midpoint construction to a multi-cushion defensive finishing zone.
Shot implementation: Multi-Rail Routes · Center ball · Medium-soft
Printed clock: CENTER BALL
Printed hardness: MEDIUM-SOFT SHOT · Application source
Classification confidence: high
Primary: Defensive / Safety Play
Secondary: Cue-Ball Control · Speed Control
Angle and travel control separate the cue ball and object ball into different end zones.
Shot implementation: Center ball · Soft
Printed clock: CENTER BALL
Printed hardness: SOFT SHOT · Application source
Classification confidence: high
Primary: Defensive / Safety Play
Secondary: Cue-Ball Control · Speed Control
Alternate traffic layout uses distinct cue/object-ball destinations to deny the next direct opportunity.
Shot implementation: Center ball · Soft
Printed clock: CENTER BALL
Printed hardness: SOFT SHOT · Application source
Classification confidence: high
Primary: Defensive / Safety Play
Secondary: Cue-Ball Control · Speed Control
Park the cue ball behind the 2/8-ball traffic while sending the object ball away.
Shot implementation: Sidespin / English · 10:30 · upper left · Soft
Printed clock: 10:30 O'CLOCK SLIGHT TOP LEFT
Printed hardness: SOFT SHOT · Application source
Classification confidence: high
Primary: Defensive / Safety Play
Secondary: Cluster Management · Cue-Ball Control · Speed Control
Deliberately create a cluster and hide the cue ball behind the 8 while sending the 1-ball down-table.
Shot implementation: Stun / Follow / Draw · 6:00 · bottom · Soft
Printed clock: 6 O'CLOCK BACKSPIN/DRAW SHOT
Printed hardness: SOFT SHOT · Application source
Classification confidence: high
Primary: Defensive / Safety Play
Secondary: Cue-Ball Control · Speed Control
Send the 8-ball up-table and the cue ball down-table to create distance separation.
Shot implementation: Center ball · Soft to medium
Printed clock: CENTER BALL
Printed hardness: SOFT TO MEDIUM SHOT · Application source
Classification confidence: high
Primary: Defensive / Safety Play
Secondary: Cue-Ball Control · Speed Control
Reverse the separation: the two balls finish at opposite table ends from the club approach.
Shot implementation: Center ball · Soft to medium
Printed clock: CENTER BALL
Printed hardness: SOFT TO MEDIUM SHOT · Application source
Classification confidence: high
Primary: Defensive / Safety Play
Secondary: Cue-Ball Control · Speed Control
Spin-assisted longer cue-ball route creates wide separation through successive cushions.
Shot implementation: Multi-Rail Routes · Sidespin / English · 1:30 · upper right · Soft to medium
Printed clock: 1:30 O'CLOCK SLIGHT TOP RIGHT
Printed hardness: SOFT TO MEDIUM SHOT · Application source
Classification confidence: high
Primary: Defensive / Safety Play
Secondary: Cue-Ball Control · Speed Control
Alternate longer cue-ball route and controlled travel place the balls far apart.
Shot implementation: Multi-Rail Routes · Sidespin / English · 7:30 · lower left · Soft to medium
Printed clock: 7:30 O'CLOCK SLIGHT BOTTOM LEFT
Printed hardness: SOFT TO MEDIUM SHOT · Application source
Classification confidence: high
Primary: Defensive / Safety Play
Secondary: Cue-Ball Control · Speed Control
Frozen-rail contact sends the cue ball up-table while restricting the object-ball movement.
Shot implementation: Center ball · Soft to medium
Printed clock: CENTER BALL
Printed hardness: SOFT TO MEDIUM SHOT · Application source
Classification confidence: high
Primary: Defensive / Safety Play
Secondary: Cue-Ball Control · Speed Control
Alternate frozen-rail approach controls cue-ball distance to create the defensive leave.
Shot implementation: Center ball · Soft to medium
Printed clock: CENTER BALL
Printed hardness: SOFT TO MEDIUM SHOT · Application source
Classification confidence: high
Primary: Defensive / Safety Play
Secondary: Cue-Ball Control · Speed Control
Non-frozen rail layout compares cue-ball continuation options, including follow, and their finishing distances.
Shot implementation: Stun / Follow / Draw · Center ball · 12:00 · top · Very soft & soft
Printed clock: CENTER BALL, 12 O'CLOCK FOLLOW SHOT
Printed hardness: VERY SOFT & SOFT SHOTS · Application source
Classification confidence: high
Primary: Defensive / Safety Play
Secondary: Cue-Ball Control · Speed Control
Alternate gapped-rail layout compares continuation options for a controlled defensive leave.
Shot implementation: Stun / Follow / Draw · Center ball · 12:00 · top · Very soft & soft
Printed clock: CENTER BALL, 12 O'CLOCK FOLLOW SHOT
Printed hardness: VERY SOFT & SOFT SHOTS · Application source
Classification confidence: high
Primary: Defensive / Safety Play
Secondary: Cue-Ball Control
Thin-cut follow/draw alternatives change which cue-ball route creates separation.
Shot implementation: Stun / Follow / Draw · 12:00 · top · 6:00 · bottom · Soft
Printed clock: 12 O'CLOCK FOLLOW SHOT, 6 O'CLOCK BACKSPIN/DRAW SHOT
Printed hardness: SOFT SHOT · Application source
Classification confidence: high
Primary: Defensive / Safety Play
Secondary: Cue-Ball Control
Kick-and-stick: rail-first contact sends the 8-ball away while retaining the cue ball behind the 9-ball blocker.
Shot implementation: Kick Shots · Center ball · Soft to medium
Printed clock: CENTER BALL
Printed hardness: SOFT TO MEDIUM SHOT · Application source
Classification confidence: high
Primary: Defensive / Safety Play
Secondary: Cue-Ball Control
Draw the cue ball behind the 9-ball to remove the opponent's direct line.
Shot implementation: Stun / Follow / Draw · 6:00 · bottom · Soft to medium
Printed clock: 6 O'CLOCK BACKSPIN/DRAW SHOT
Printed hardness: SOFT TO MEDIUM SHOT · Application source
Classification confidence: high
Primary: Defensive / Safety Play
Secondary: Cue-Ball Control · Speed Control
Move the 8-ball behind the 2-ball blocker while controlling the cue ball near the upper-right area.
Shot implementation: Center ball · Soft
Printed clock: CENTER BALL
Printed hardness: SOFT SHOT · Application source
Classification confidence: high
Primary: Defensive / Safety Play
Secondary: Cue-Ball Control · Speed Control
Draw separates the cue ball and object ball into the marked opposite finishing zones.
Shot implementation: Stun / Follow / Draw · 6:00 · bottom · Soft to medium
Printed clock: 6 O'CLOCK BACKSPIN/DRAW SHOT
Printed hardness: SOFT TO MEDIUM SHOT · Application source
Classification confidence: high
Primary: Defensive / Safety Play
Secondary: Cue-Ball Control · Speed Control
Club approach uses draw and controlled travel to finish the two balls in separate zones.
Shot implementation: Stun / Follow / Draw · 6:00 · bottom · Soft to medium
Printed clock: 6 O'CLOCK BACKSPIN/DRAW SHOT
Printed hardness: SOFT TO MEDIUM SHOT · Application source
Classification confidence: high
Primary: Defensive / Safety Play
Secondary: Cue-Ball Control · Speed Control
Diamond approach changes the draw direction while retaining the two-zone defensive objective.
Shot implementation: Stun / Follow / Draw · Sidespin / English · 7:30 · lower left · Soft to medium
Printed clock: 7:30 O'CLOCK SLIGHT BOTTOM LEFT
Printed hardness: SOFT TO MEDIUM SHOT · Application source
Classification confidence: high
Primary: Defensive / Safety Play
Secondary: Cue-Ball Control · Speed Control
Heart approach calibrates draw travel to achieve the indicated opposing defensive destinations.
Shot implementation: Stun / Follow / Draw · Sidespin / English · 7:30 · lower left · Soft to medium
Printed clock: 7:30 O'CLOCK SLIGHT BOTTOM LEFT
Printed hardness: SOFT TO MEDIUM SHOT · Application source
Classification confidence: high
Primary: Rail / Diamond Systems
Secondary: None
One-cushion cue-ball route uses the difference/2 plus 1 construction with outside sidespin; the artwork's Bank label is stale.
Shot implementation: Kick Shots · Sidespin / English · 9:00 · left · Medium to hard
Printed clock: 9 O'CLOCK LEFT SIDE SPIN
Printed hardness: MEDIUM TO HARD SHOT · Application source
Classification confidence: medium · Author review required
App uses the updated Kick name while the PNG retains Bank wording. Moving cue-ball route supports kick; artwork needs synchronization. Withheld: Bank Shots.
Primary: Rail / Diamond Systems
Secondary: None
Club starting arrangement applies the numbered difference construction to a one-cushion cue-ball kick.
Shot implementation: Kick Shots · Sidespin / English · 9:00 · left · Medium to hard
Printed clock: 9 O'CLOCK LEFT SIDE SPIN
Printed hardness: MEDIUM TO HARD SHOT · Application source
Classification confidence: medium · Author review required
App uses the updated Kick name while the PNG retains Bank wording. Moving cue-ball route supports kick; artwork needs synchronization. Withheld: Bank Shots.
Primary: Rail / Diamond Systems
Secondary: None
Diamond approach uses the numbered aiming construction and outside-sidespin cue-ball return.
Shot implementation: Kick Shots · Sidespin / English · 9:00 · left · Medium to hard
Printed clock: 9 O'CLOCK LEFT SIDE SPIN
Printed hardness: MEDIUM TO HARD SHOT · Application source
Classification confidence: medium · Author review required
App uses the updated Kick name while the PNG retains Bank wording. Moving cue-ball route supports kick; artwork needs synchronization. Withheld: Bank Shots.
Primary: Rail / Diamond Systems
Secondary: None
Heart approach transfers the difference-based one-cushion kick construction.
Shot implementation: Kick Shots · Sidespin / English · 3:00 · right · Medium to hard
Printed clock: 3 O'CLOCK RIGHT SIDE SPIN
Printed hardness: MEDIUM TO HARD SHOT · Application source
Classification confidence: medium · Author review required
App uses the updated Kick name while the PNG retains Bank wording. Moving cue-ball route supports kick; artwork needs synchronization. Withheld: Bank Shots.
Primary: Rail / Diamond Systems
Secondary: None
Numbered one-cushion cue-ball route uses its spin-dependent adjustment, despite the old Bank artwork label.
Shot implementation: Kick Shots · Sidespin / English · 1:30 · upper right · Medium-soft
Printed clock: 1:30 O'CLOCK SLIGHT TOP RIGHT
Printed hardness: MEDIUM-SOFT SHOT · Application source
Classification confidence: medium · Author review required
App uses the updated Kick name while the PNG retains Bank wording. Moving cue-ball route supports kick; artwork needs synchronization. Withheld: Bank Shots.
Primary: Rail / Diamond Systems
Secondary: None
Club route applies the numbered one-cushion aiming adjustment with sidespin.
Shot implementation: Kick Shots · Sidespin / English · 1:30 · upper right · Medium-soft
Printed clock: 1:30 O'CLOCK SLIGHT TOP RIGHT
Printed hardness: MEDIUM-SOFT SHOT · Application source
Classification confidence: medium · Author review required
App uses the updated Kick name while the PNG retains Bank wording. Moving cue-ball route supports kick; artwork needs synchronization. Withheld: Bank Shots.
Primary: Rail / Diamond Systems
Secondary: None
One-cushion numbered cue-ball route is clear, but follow metadata conflicts with the artwork's English/contact indication; additional spin tags are withheld.
Shot implementation: Kick Shots · Sidespin / English · 1:30 · upper right · Medium-soft
Printed clock: 1:30 O'CLOCK SLIGHT TOP RIGHT
Printed hardness: MEDIUM-SOFT SHOT · Application source
Stale Bank artwork label and follow-versus-English contact conflict. Keep kick/system; withhold spin-specific associations.
Classification confidence: medium · Author review required
Stale Bank artwork label and follow-versus-English contact conflict. Keep kick/system; withhold spin-specific associations. Withheld: Stun / Follow / Draw, Sidespin / English, Bank Shots.
Primary: Rail / Diamond Systems
Secondary: None
Heart route uses the numbered one-cushion construction and indicated sidespin adjustment.
Shot implementation: Kick Shots · Sidespin / English · 3:00 · right · Medium-soft
Printed clock: 3 O'CLOCK RIGHT SIDE SPIN
Printed hardness: MEDIUM-SOFT SHOT · Application source
Classification confidence: medium · Author review required
App uses the updated Kick name while the PNG retains Bank wording. Moving cue-ball route supports kick; artwork needs synchronization. Withheld: Bank Shots.
Primary: Escape / Recovery
Secondary: None
Two-cushion Z route goes around the intervening red/blue blockers to reach the target.
Shot implementation: Kick Shots · Multi-Rail Routes · Sidespin / English · 3:00 · right · Medium
Printed clock: 3 O'CLOCK RIGHT SIDE SPIN
Printed hardness: MEDIUM SHOT · Application source
Classification confidence: high
Primary: Escape / Recovery
Secondary: None
Club starting arrangement uses a two-cushion Z route around direct-line blockers.
Shot implementation: Kick Shots · Multi-Rail Routes · Sidespin / English · 1:30 · upper right · Medium
Printed clock: 1:30 O'CLOCK SLIGHT TOP RIGHT
Printed hardness: MEDIUM SHOT · Application source
Classification confidence: high
Primary: Escape / Recovery
Secondary: None
Diamond arrangement navigates the blocked direct line with two cushion contacts.
Shot implementation: Kick Shots · Multi-Rail Routes · Sidespin / English · 3:00 · right · Medium
Printed clock: 3 O'CLOCK RIGHT SIDE SPIN
Printed hardness: MEDIUM SHOT · Application source
Classification confidence: high
Primary: Escape / Recovery
Secondary: None
Heart arrangement uses the Z route to avoid the intervening blockers.
Shot implementation: Kick Shots · Multi-Rail Routes · Sidespin / English · 1:30 · upper right · Medium
Printed clock: 1:30 O'CLOCK SLIGHT TOP RIGHT
Printed hardness: MEDIUM SHOT · Application source
Classification confidence: high
Primary: Escape / Recovery
Secondary: None
Longer Z arrangement retains two cushion contacts around the intervening balls.
Shot implementation: Kick Shots · Multi-Rail Routes · Sidespin / English · 3:00 · right · Hard
Printed clock: 3 O'CLOCK RIGHT SIDE SPIN
Printed hardness: HARD SHOT · Application source
Classification confidence: high
Primary: Escape / Recovery
Secondary: None
Longer club approach reaches the target through two cushions around the direct-line obstruction.
Shot implementation: Kick Shots · Multi-Rail Routes · Sidespin / English · 3:00 · right · Hard
Printed clock: 3 O'CLOCK RIGHT SIDE SPIN
Printed hardness: HARD SHOT · Application source
Classification confidence: high
Primary: Escape / Recovery
Secondary: None
Longer diamond approach negotiates the blockers with the illustrated two-cushion route.
Shot implementation: Kick Shots · Multi-Rail Routes · Sidespin / English · 3:00 · right · Hard
Printed clock: 3 O'CLOCK RIGHT SIDE SPIN
Printed hardness: HARD SHOT · Application source
Classification confidence: high
Primary: Escape / Recovery
Secondary: None
Longer heart approach completes the two-cushion Z escape around traffic.
Shot implementation: Kick Shots · Multi-Rail Routes · Sidespin / English · 3:00 · right · Hard
Printed clock: 3 O'CLOCK RIGHT SIDE SPIN
Printed hardness: HARD SHOT · Application source
Classification confidence: high
Primary: Defensive / Safety Play
Secondary: Two-Way Shots · Cue-Ball Control
Author clarified on 2026-10-06 that defense is the primary purpose of every White card. Try the scoring ball while arranging a difficult 8-ball reply if missed; the call-safety note depends on the game rules.
Shot implementation: Sidespin / English · 7:30 · lower left · Soft
Printed clock: 7:30 O'CLOCK SLIGHT BOTTOM LEFT
Printed hardness: SOFT SHOT · Application source
Classification confidence: medium · Author review required
Two-way intention is explicit, but call-safety/scoring language depends on the ruleset. Confirm intended game rules before publishing tactical advice.
Primary: Defensive / Safety Play
Secondary: Two-Way Shots · Cue-Ball Control
Author clarified on 2026-10-06 that defense is the primary purpose of every White card. Try the 2-ball and hide the cue ball if unsuccessful, subject to the card's call-safety rules context.
Shot implementation: Stun / Follow / Draw · 12:00 · top · Soft
Printed clock: 12 O'CLOCK FOLLOW SHOT
Printed hardness: SOFT SHOT · Application source
Classification confidence: medium · Author review required
Two-way intention is explicit, but call-safety/scoring language depends on the ruleset. Confirm intended game rules before publishing tactical advice.
Primary: Defensive / Safety Play
Secondary: Two-Way Shots · Cue-Ball Control
Author clarified on 2026-10-06 that defense is the primary purpose of every White card. Alternate 2-ball attempt combines pocketing intent with a concealed cue-ball fallback.
Shot implementation: Sidespin / English · 10:30 · upper left · Soft
Printed clock: 10:30 O'CLOCK SLIGHT TOP LEFT
Printed hardness: SOFT SHOT · Application source
Classification confidence: medium · Author review required
Two-way intention is explicit, but call-safety/scoring language depends on the ruleset. Confirm intended game rules before publishing tactical advice.
Primary: Defensive / Safety Play
Secondary: Two-Way Shots · Cue-Ball Control
Author clarified on 2026-10-06 that defense is the primary purpose of every White card. Try the 8-ball while leaving a difficult 1-ball opportunity after a miss; the intended ruleset must be confirmed.
Shot implementation: Sidespin / English · 7:30 · lower left · Soft
Printed clock: 7:30 O'CLOCK SLIGHT BOTTOM LEFT
Printed hardness: SOFT SHOT · Application source
Classification confidence: medium · Author review required
Two-way intention is explicit, but call-safety/scoring language depends on the ruleset. Confirm intended game rules before publishing tactical advice.
Primary: Defensive / Safety Play
Secondary: Cue-Ball Control · Speed Control
Place the cue ball in the upper shaded zone behind the 8 while moving the 1-ball away.
Shot implementation: Sidespin / English · 7:30 · lower left · Very soft
Printed clock: 7:30 O'CLOCK SLIGHT BOTTOM LEFT
Printed hardness: VERY SOFT SHOT · Application source
Classification confidence: high
Primary: Defensive / Safety Play
Secondary: Cue-Ball Control · Speed Control
Club angle changes the routes but retains the upper hidden cue-ball destination and object-ball separation.
Shot implementation: Sidespin / English · 4:30 · lower right · Very soft
Printed clock: 4:30 O'CLOCK SLIGHT BOTTOM RIGHT
Printed hardness: VERY SOFT SHOT · Application source
Classification confidence: high
Primary: Defensive / Safety Play
Secondary: Cue-Ball Control · Speed Control
Diamond layout requires controlled cue-ball travel behind the blocker and a separated object ball.
Shot implementation: Sidespin / English · 7:30 · lower left · Very soft
Printed clock: 7:30 O'CLOCK SLIGHT BOTTOM LEFT
Printed hardness: VERY SOFT SHOT · Application source
Classification confidence: high
Primary: Defensive / Safety Play
Secondary: Cue-Ball Control · Speed Control
Heart layout sends the cue ball into the shaded protected zone rather than preparing an offensive next ball.
Shot implementation: Sidespin / English · 4:30 · lower right · Very soft
Printed clock: 4:30 O'CLOCK SLIGHT BOTTOM RIGHT
Printed hardness: VERY SOFT SHOT · Application source
Classification confidence: high
Primary: Defensive / Safety Play
Secondary: Cue-Ball Control · Speed Control
Angle and traffic control place the balls in separate defensive finishing zones.
Shot implementation: Sidespin / English · 1:30 · upper right · Soft
Printed clock: 1:30 O'CLOCK SLIGHT TOP RIGHT
Printed hardness: SOFT SHOT · Application source
Classification confidence: high
Primary: Defensive / Safety Play
Secondary: Cue-Ball Control · Speed Control
Control object-ball down-table travel and the cue-ball finishing area to create distance.
Shot implementation: Sidespin / English · 7:30 · lower left · Soft
Printed clock: 7:30 O'CLOCK SLIGHT BOTTOM LEFT
Printed hardness: SOFT SHOT · Application source
Classification confidence: high
Primary: Defensive / Safety Play
Secondary: Cue-Ball Control · Speed Control
Alternate separation sends the object ball away while controlling the opposite cue-ball destination.
Shot implementation: Sidespin / English · 4:30 · lower right · Soft to medium
Printed clock: 4:30 O'CLOCK SLIGHT BOTTOM RIGHT
Printed hardness: SOFT TO MEDIUM SHOT · Application source
Classification confidence: high
Primary: Defensive / Safety Play
Secondary: Cue-Ball Control · Speed Control
Heart approach balances the two ball distances to achieve the marked defensive separation.
Shot implementation: Center ball · Soft to medium
Printed clock: CENTER BALL
Printed hardness: SOFT TO MEDIUM SHOT · Application source
Classification confidence: high
Primary: Defensive / Safety Play
Secondary: Cue-Ball Control
Compare follow and draw alternatives that hide different balls behind the available traffic.
Shot implementation: Stun / Follow / Draw · 12:00 · top · 6:00 · bottom · Soft
Printed clock: 12 O'CLOCK FOLLOW SHOT, 6 O'CLOCK BACKSPIN/DRAW SHOT
Printed hardness: SOFT SHOT · Application source
Classification confidence: high
Primary: Defensive / Safety Play
Secondary: Cue-Ball Control · Speed Control
An undercut creates separation; control cue-ball travel so the resulting distance remains defensive.
Shot implementation: Sidespin / English · 7:30 · lower left · Soft
Printed clock: 7:30 O'CLOCK SLIGHT BOTTOM LEFT
Printed hardness: SOFT SHOT · Application source
Classification confidence: high
Primary: Defensive / Safety Play
Secondary: Cue-Ball Control · Speed Control
Use the 12-ball near the 8 as an obstruction and control the cue-ball finishing area.
Shot implementation: Center ball · Soft
Printed clock: CENTER BALL
Printed hardness: SOFT SHOT · Application source
Classification confidence: high
Primary: Defensive / Safety Play
Secondary: Cue-Ball Control · Speed Control
Alternate blocking arrangement uses existing traffic and a controlled cue-ball destination.
Shot implementation: Center ball · Soft
Printed clock: CENTER BALL
Printed hardness: SOFT SHOT · Application source
Classification confidence: high
Primary: Defensive / Safety Play
Secondary: Cue-Ball Control
Use the illustrated 45-degree relationship to separate the balls and conceal the cue-ball route.
Shot implementation: Center ball · Soft
Printed clock: CENTER BALL
Printed hardness: SOFT SHOT · Application source
Classification confidence: high
Primary: Defensive / Safety Play
Secondary: Cue-Ball Control
The 60-degree layout develops cue-ball route prediction for the defensive leave.
Shot implementation: Stun / Follow / Draw · 6:00 · bottom · Soft
Printed clock: 6 O'CLOCK BACKSPIN/DRAW SHOT
Printed hardness: SOFT SHOT · Application source
Classification confidence: high
Primary: Defensive / Safety Play
Secondary: Cue-Ball Control
Defensive cue-ball route is evident, but the artwork's 60-degree label conflicts with the application's 30-degree title.
Shot implementation: Stun / Follow / Draw · 6:00 · bottom · Soft
Printed clock: 6 O'CLOCK BACKSPIN/DRAW SHOT
Printed hardness: SOFT SHOT · Application source
Classification confidence: medium · Author review required
Artwork labels 60 degrees while app title says 30 degrees. Safety/control tags do not depend on accepting either angle.
Primary: Defensive / Safety Play
Secondary: Cue-Ball Control
The artwork's 30-degree construction develops a defensive cue-ball route; its title differs from the application's hide-cue label.
Shot implementation: Stun / Follow / Draw · 6:00 · bottom · Soft
Printed clock: 6 O'CLOCK BACKSPIN/DRAW SHOT
Printed hardness: SOFT SHOT · Application source
Classification confidence: medium · Author review required
Artwork labels a 30-degree construction while the app title says hide cue ball. Confirm title and source synchronization.
Primary: Defensive / Safety Play
Secondary: Cue-Ball Control
Compare stops behind, on and in front of the blocker using different cue-ball continuations.
Shot implementation: Stun / Follow / Draw · 12:00 · top · Very soft
Printed clock: 12 O'CLOCK FOLLOW SHOT
Printed hardness: VERY SOFT SHOT · Application source
Classification confidence: high
Primary: Defensive / Safety Play
Secondary: Cue-Ball Control
Draw/stop alternatives control the cue-ball position relative to the intervening ball.
Shot implementation: Stun / Follow / Draw · 6:00 · bottom · Very soft
Printed clock: 6 O'CLOCK BACKSPIN/DRAW SHOT
Printed hardness: VERY SOFT SHOT · Application source
Classification confidence: high
Primary: Defensive / Safety Play
Secondary: Cue-Ball Control · Speed Control
Two illustrated options send the object ball away while hiding the cue ball behind existing traffic.
Shot implementation: Stun / Follow / Draw · 12:00 · top · Very soft
Printed clock: 12 O'CLOCK FOLLOW SHOT
Printed hardness: VERY SOFT SHOT · Application source
Classification confidence: high
Primary: Defensive / Safety Play
Secondary: Cue-Ball Control · Speed Control
Alternate two-option layout balances object-ball travel and cue-ball concealment.
Shot implementation: Stun / Follow / Draw · 12:00 · top · Very soft
Printed clock: 12 O'CLOCK FOLLOW SHOT
Printed hardness: VERY SOFT SHOT · Application source
Classification confidence: high
Primary: Defensive / Safety Play
Secondary: Cue-Ball Control · Speed Control
Frozen-rail contact develops a controlled hidden cue-ball leave with limited object-ball movement.
Shot implementation: Center ball · Soft
Printed clock: CENTER BALL
Printed hardness: SOFT SHOT · Application source
Classification confidence: high
Primary: Defensive / Safety Play
Secondary: Cue-Ball Control · Speed Control
Alternate frozen-rail starting angle changes the cue-ball distance needed for concealment.
Shot implementation: Center ball · Soft
Printed clock: CENTER BALL
Printed hardness: SOFT SHOT · Application source
Classification confidence: high
Primary: Defensive / Safety Play
Secondary: Cue-Ball Control · Speed Control
Gapped-rail layout compares two continuation choices and controlled cue-ball travel.
Shot implementation: Stun / Follow / Draw · Center ball · 12:00 · top · Soft / very soft
Printed clock: CENTER BALL, 12 O'CLOCK FOLLOW SHOT
Printed hardness: SOFT, VERY SOFT SHOT · Application source
Classification confidence: high
Primary: Defensive / Safety Play
Secondary: Cue-Ball Control · Speed Control
Alternate non-frozen rail layout compares continuation options for the defensive leave.
Shot implementation: Stun / Follow / Draw · Center ball · 12:00 · top · Soft / very soft
Printed clock: CENTER BALL, 12 O'CLOCK FOLLOW SHOT
Printed hardness: SOFT, VERY SOFT SHOT · Application source
Classification confidence: high
Primary: Defensive / Safety Play
Secondary: Cue-Ball Control · Speed Control
Compare the upper hide-cue-ball example with the lower hide-object-ball example and their finishing zones.
Shot implementation: Stun / Follow / Draw · Center ball · 6:00 · bottom · Soft / very soft
Printed clock: CENTER BALL, 6 O'CLOCK BACKSPIN/DRAW SHOT
Printed hardness: SOFT, VERY SOFT SHOT · Application source
Classification confidence: high
Primary: Defensive / Safety Play
Secondary: Cue-Ball Control · Speed Control
Compare an upper hidden object ball with a lower hidden cue ball; the defensive destinations differ.
Shot implementation: Stun / Follow / Draw · Center ball · 6:00 · bottom · Soft / very soft
Printed clock: CENTER BALL, 6 O'CLOCK BACKSPIN/DRAW SHOT
Printed hardness: SOFT, VERY SOFT SHOT · Application source
Classification confidence: high
Primary: Defensive / Safety Play
Secondary: Cue-Ball Control · Speed Control
Two concealment examples require controlling which ball finishes behind the obstruction.
Shot implementation: Stun / Follow / Draw · 12:00 · top · Soft / very soft
Printed clock: 12 O'CLOCK FOLLOW SHOT
Printed hardness: SOFT, VERY SOFT SHOT · Application source
Classification confidence: high
Primary: Defensive / Safety Play
Secondary: Cue-Ball Control
Use draw to conceal the cue ball behind the indicated blocker.
Shot implementation: Stun / Follow / Draw · 6:00 · bottom · Soft
Printed clock: 6 O'CLOCK BACKSPIN/DRAW SHOT
Printed hardness: SOFT SHOT · Application source
Classification confidence: high
Primary: Defensive / Safety Play
Secondary: Cue-Ball Control · Speed Control
Thin cut limits object-ball movement while the cue ball travels through two cushions into the lower zone.
Shot implementation: Multi-Rail Routes · Sidespin / English · 1:30 · upper right · Soft
Printed clock: 1:30 O'CLOCK SLIGHT TOP RIGHT
Printed hardness: SOFT SHOT · Application source
Classification confidence: high
Primary: Defensive / Safety Play
Secondary: Cue-Ball Control · Speed Control
Club thin-cut approach balances minimal object-ball travel against a two-cushion cue-ball return.
Shot implementation: Multi-Rail Routes · Sidespin / English · 10:30 · upper left · Soft
Printed clock: 10:30 O'CLOCK SLIGHT TOP LEFT
Printed hardness: SOFT SHOT · Application source
Classification confidence: high
Primary: Defensive / Safety Play
Secondary: Cue-Ball Control · Speed Control
Diamond thin-cut route sends the cue ball through two cushions toward the shaded defensive zone.
Shot implementation: Multi-Rail Routes · Sidespin / English · 1:30 · upper right · Soft
Printed clock: 1:30 O'CLOCK SLIGHT TOP RIGHT
Printed hardness: SOFT SHOT · Application source
Classification confidence: high
Primary: Defensive / Safety Play
Secondary: Cue-Ball Control · Speed Control
Heart thin-cut route requires a controlled longer cue-ball arrival while leaving the object ball nearby.
Shot implementation: Multi-Rail Routes · Sidespin / English · 10:30 · upper left · Soft
Printed clock: 10:30 O'CLOCK SLIGHT TOP LEFT
Printed hardness: SOFT SHOT · Application source
Classification confidence: high
Primary: Defensive / Safety Play
Secondary: Cue-Ball Control · Speed Control
Nine-ball undercut example uses the resulting cue-ball route and distance to deny a comfortable reply.
Shot implementation: Sidespin / English · 4:30 · lower right · Soft
Printed clock: 4:30 O'CLOCK SLIGHT BOTTOM RIGHT
Printed hardness: SOFT SHOT · Application source
Classification confidence: high
Primary: Defensive / Safety Play
Secondary: Cue-Ball Control · Speed Control
Alternate nine-ball undercut layout controls the cue-ball leave rather than treating pocketing as the only objective.
Shot implementation: Sidespin / English · 4:30 · lower right · Soft
Printed clock: 4:30 O'CLOCK SLIGHT BOTTOM RIGHT
Printed hardness: SOFT SHOT · Application source
Classification confidence: high
Primary: Defensive / Safety Play
Secondary: Cue-Ball Control · Speed Control
Eight-ball undercut example uses ball separation and controlled cue-ball travel defensively.
Shot implementation: Sidespin / English · 4:30 · lower right · Very soft
Printed clock: 4:30 O'CLOCK SLIGHT BOTTOM RIGHT
Printed hardness: VERY SOFT SHOT · Application source
Classification confidence: high
Primary: Defensive / Safety Play
Secondary: Cue-Ball Control · Speed Control
Alternate eight-ball undercut arrangement changes the approach while preserving the defensive leave.
Shot implementation: Sidespin / English · 4:30 · lower right · Very soft
Printed clock: 4:30 O'CLOCK SLIGHT BOTTOM RIGHT
Printed hardness: VERY SOFT SHOT · Application source
Classification confidence: high
Primary: Defensive / Safety Play
Secondary: Cue-Ball Control · Speed Control
Hide a ball behind existing traffic and control the cue-ball destination.
Shot implementation: Sidespin / English · 7:30 · lower left · Very soft
Printed clock: 7:30 O'CLOCK SLIGHT BOTTOM LEFT
Printed hardness: VERY SOFT SHOT · Application source
Classification confidence: high
Primary: Defensive / Safety Play
Secondary: Cue-Ball Control · Speed Control
Artwork shows a hide-a-ball safety; the application's frozen-ball title needs reconciliation.
Shot implementation: Sidespin / English · 7:30 · lower left · Very soft
Printed clock: 7:30 O'CLOCK SLIGHT BOTTOM LEFT
Printed hardness: VERY SOFT SHOT · Application source
Classification confidence: medium · Author review required
Hide-a-ball artwork conflicts with frozen-ball app title. Use depicted safety/control objective pending reconciliation.
Primary: Defensive / Safety Play
Secondary: Cue-Ball Control
Ball-in-hand frozen-pair stop-shot layout creates a defensive leave; combination tagging is withheld until the transfer sequence is confirmed.
Shot implementation: Center ball · Soft
Printed clock: CENTER BALL
Printed hardness: SOFT SHOT · Application source
Frozen-pair transfer is not sufficiently explicit to add combination instruction. Confirm contact sequence and principal objective.
Classification confidence: medium · Author review required
Frozen-pair transfer is not sufficiently explicit to add combination instruction. Confirm contact sequence and principal objective. Withheld: Combination Shots.
Primary: Defensive / Safety Play
Secondary: Cue-Ball Control
Frozen-pair game arrangement creates separation; confirm the ball-to-ball transfer before adding a combination tag.
Shot implementation: Center ball · Soft
Printed clock: CENTER BALL
Printed hardness: SOFT SHOT · Application source
Frozen-pair transfer is not sufficiently explicit to add combination instruction. Confirm contact sequence and principal objective.
Classification confidence: medium · Author review required
Frozen-pair transfer is not sufficiently explicit to add combination instruction. Confirm contact sequence and principal objective. Withheld: Combination Shots.
Primary: Defensive / Safety Play
Secondary: Cue-Ball Control · Speed Control
Two options compare blocking a ball with separating the balls; both require controlled cue-ball finishing distance.
Shot implementation: Stun / Follow / Draw · Center ball · 12:00 · top · Soft
Printed clock: 12 O'CLOCK FOLLOW SHOT, CENTER BALL
Printed hardness: SOFT SHOT · Application source
Classification confidence: high
Primary: Defensive / Safety Play
Secondary: Cue-Ball Control · Speed Control
Longer cushion route separates the balls and controls the defensive cue-ball destination.
Shot implementation: Multi-Rail Routes · Sidespin / English · 10:30 · upper left · Soft
Printed clock: 10:30 O'CLOCK SLIGHT TOP LEFT
Printed hardness: SOFT SHOT · Application source
Classification confidence: high
Primary: Defensive / Safety Play
Secondary: Cue-Ball Control · Speed Control
Two blocking alternatives compare which defensive destination best removes the direct reply.
Shot implementation: Sidespin / English · 7:30 · lower left · Soft to medium
Printed clock: 7:30 O'CLOCK SLIGHT BOTTOM LEFT
Printed hardness: SOFT TO MEDIUM SHOT · Application source
Classification confidence: high
Primary: Defensive / Safety Play
Secondary: Cue-Ball Control · Speed Control
Nine/eight-ball traffic arrangement uses existing blockers and controlled ball separation.
Shot implementation: Sidespin / English · 7:30 · lower left · 10:30 · upper left · Soft
Printed clock: 7:30 O'CLOCK SLIGHT BOTTOM LEFT, 10:30 O'CLOCK SLIGHT TOP LEFT
Printed hardness: SOFT SHOT · Application source
Classification confidence: high
Primary: Defensive / Safety Play
Secondary: Rail / Diamond Systems
The 4.5 Minus two-cushion route reaches a protected area through traffic; a legal object-ball contact is not established by this schematic.
Shot implementation: Multi-Rail Routes · Sidespin / English · 3:00 · right · Soft
Printed clock: 3 O'CLOCK RIGHT SIDE SPIN
Printed hardness: SOFT SHOT · Application source
Defensive system route is shown without an unambiguous legal target-contact sequence. Confirm contact before adding kick; preserve the printed system name.
Classification confidence: medium · Author review required
Defensive system route is shown without an unambiguous legal target-contact sequence. Confirm contact before adding kick; preserve the printed system name. Withheld: Kick Shots.
Primary: Defensive / Safety Play
Secondary: Rail / Diamond Systems
The 3.5 Plus one-cushion route is applied to a protected destination among blockers; kick tagging is withheld pending contact confirmation.
Shot implementation: Sidespin / English · 1:30 · upper right · Soft
Printed clock: 1:30 O'CLOCK SLIGHT TOP RIGHT
Printed hardness: SOFT SHOT · Application source
Defensive system route is shown without an unambiguous legal target-contact sequence. Confirm contact before adding kick; preserve the printed system name.
Classification confidence: medium · Author review required
Defensive system route is shown without an unambiguous legal target-contact sequence. Confirm contact before adding kick; preserve the printed system name. Withheld: Kick Shots.
Primary: Defensive / Safety Play
Secondary: Rail / Diamond Systems
The 11 Minus two-cushion route is applied defensively through traffic; the complete legal-contact sequence needs confirmation.
Shot implementation: Multi-Rail Routes · Sidespin / English · 1:30 · upper right · Soft
Printed clock: 1:30 O'CLOCK SLIGHT TOP RIGHT
Printed hardness: SOFT SHOT · Application source
Defensive system route is shown without an unambiguous legal target-contact sequence. Confirm contact before adding kick; preserve the printed system name.
Classification confidence: medium · Author review required
Defensive system route is shown without an unambiguous legal target-contact sequence. Confirm contact before adding kick; preserve the printed system name. Withheld: Kick Shots.
Primary: Defensive / Safety Play
Secondary: Rail / Diamond Systems
The printed 6 Minus three-cushion construction is applied defensively; preserve its name and confirm the target-contact sequence.
Shot implementation: Multi-Rail Routes · Sidespin / English · 1:30 · upper right · Soft
Printed clock: 1:30 O'CLOCK SLIGHT TOP RIGHT
Printed hardness: SOFT SHOT · Application source
Defensive system route is shown without an unambiguous legal target-contact sequence. Confirm contact before adding kick; preserve the printed system name.
Classification confidence: medium · Author review required
Defensive system route is shown without an unambiguous legal target-contact sequence. Confirm contact before adding kick; preserve the printed system name. Withheld: Kick Shots.
55 cards need reconciliation or confirmation. Follow a card link to see the recommended classification and specific question.
Version 2026-10-06.4. Production application inventory and all 260 diagrams were inspected alongside the books repository and current Notion documentation. Latest Black Book author revisions take priority over earlier draft copy. Other decks use their current diagrams and metadata, with unresolved conflicts recorded above.
Generic “problem solving” and “specialty” labels are not added by default. Route planning is represented by demonstrated rail systems, cue-ball control or offensive position play. Sparse combination, cluster or two-way coverage is a finding under these definitions, not a judgment about deck quality.
High-resolution PNG ↓ · All classifications CSV ↓ · Canonical data JSON ↓